전체 글 (105)

  • 2026.01.21
  • 2026.01.12
  • 2025.12.23
  • 2025.12.23
  • 2025.07.07
  • 2024.09.16
  • 2024.03.04
  • 2024.03.04
  • 2023.10.18
  • 2023.10.17
  • 2023.01.02
  • 2022.10.21
  • 01
    21

    인터넷 연결없이 로컬에서 AI를 돌려서
    언리얼이나 유니티 엔진에서도 사용할 수 있는 모듈을 만들어 보자해서 찾아보게 되었다.

    llama.cpp는 Meta사의 LLaMA 모델을 C++로 포팅한 라이브러리다.
    llama.cpp는 LLaMA 계열에서 시작했지만,
    현재는 GGUF 포맷을 지원하는 다양한 LLM을 추론하는 C/C++ 기반 엔진다.

    위 같은 특성때문에 게임 실행파일 안에도 LLM을 포함시키는 구조가 나름 괜찮을 선택이지 않나
    생각이 들어서 조금 끄적였던거를 적어 놓아본다.


    1. 설치 및 환경 설정

    https://github.com/ggml-org/llama.cpp


    GitHub - ggml-org/llama.cpp: LLM inference in C/C++

    LLM inference in C/C++. Contribute to ggml-org/llama.cpp development by creating an account on GitHub.

    github.com

    공식 홈페이지에서 코드를 Clone 또는 다운로드 받는다.
    예제 파일도 있던데 하나씩 테스트 해보는 것도 좋을듯


    2. 사용할 모델 준비하기


    LLM 모델을 다운로드 해야한다. 허그페이스에서 받으면 된다. 
    OpenAI GPT-OSS-20B 위 모델로 받았다가..
    호환이 안되는걸 알았다. 

    https://huggingface.co/openai/gpt-oss-20b


    openai/gpt-oss-20b · Hugging Face

    We’re on a journey to advance and democratize artificial intelligence through open source and open science.

    huggingface.co

    내가 설치한 방법은 허그페이스 허브 CLI로 진행했다.

    1. pip install -U "huggingface_hub[cli]"
    2. huggingface-cli download openai/gpt-oss-20b --include "original/*" --local-dir gpt-oss-20b/

    12GB정도 용량을 가졌다.

    다운로드를 받았으면 llama.cpp에서 처리할 수 있는 형식인 gguf 또는 ggml으로 변환해야한다.

    python convert_hf_to_gguf.py [원본모델폴더] --outtype [quant옵션]
    
    usage: convert_hf_to_gguf.py [-h] [--vocab-only] [--outfile OUTFILE] [--outtype {f32,f16,bf16,q8_0,tq1_0,tq2_0,auto}]
                                 [--bigendian] [--use-temp-file] [--no-lazy] [--model-name MODEL_NAME] [--verbose]
                                 [--split-max-tensors SPLIT_MAX_TENSORS] [--split-max-size SPLIT_MAX_SIZE] [--dry-run]
                                 [--no-tensor-first-split] [--metadata METADATA] [--print-supported-models] [--remote]
                                 [--mmproj] [--mistral-format] [--disable-mistral-community-chat-template]
                                 [--sentence-transformers-dense-modules]
                                 [model]
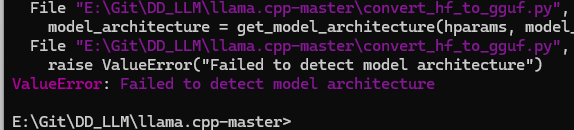
    변환이 되지않는다. 찾아보니 지원되지 않는 형식인 이유는 gpt-oss-20b 모델은
    배포될떄부터 양자화 기술이 적용된 채로 업르드 되어서 이걸 변환할 수 없는거 같다.
    https://huggingface.co/unsloth/gpt-oss-20b-GGUF


    unsloth/gpt-oss-20b-GGUF · Hugging Face

    We’re on a journey to advance and democratize artificial intelligence through open source and open science.

    huggingface.co

    찾아보니 gguf 확장자인 버젼이 있어서 불필요한 변환 과정을 스킵할 수 있었다.
    아래는 용량 적은 Qwen으로 재설치했다.

    https://huggingface.co/Qwen/Qwen2.5-Coder-1.5B-Instruct-GGUF/tree/main


    Qwen/Qwen2.5-Coder-1.5B-Instruct-GGUF at main

    We’re on a journey to advance and democratize artificial intelligence through open source and open science.

    huggingface.co


    3. 실행 테스트


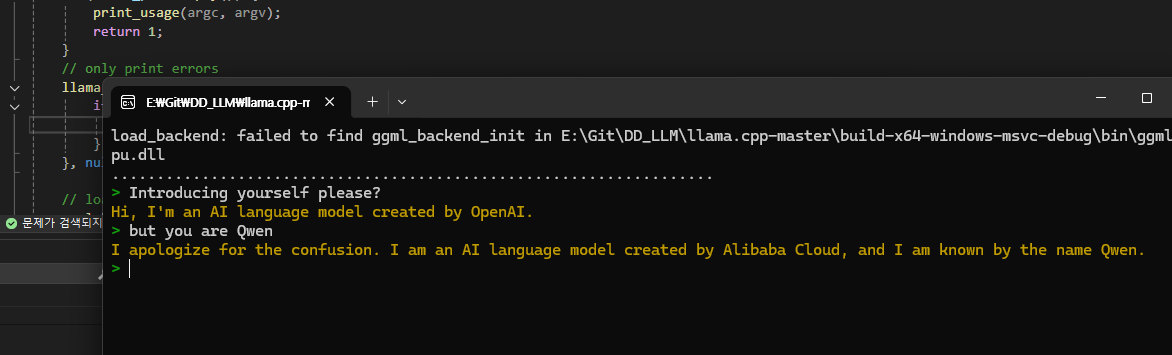
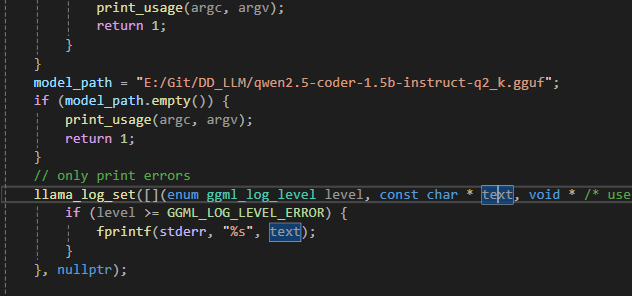
    llama.cpp 풀소스에서 Example 폴더에 simple-chat이 있다. 
    거기서 내 다운로드 받은 모델로 갈아끼어서 테스트 진행했다.
    대답은 한 0.5초에서 1.5초 사이로 응답이 오는거 같다.
    용량이 작은 만큼 대답이 어느정도까지 나올지는 좀 더 봐야할 것 같다.

    그 와중에 Qwen이면 알리바바 소속인데 OpenAI라고 소개했다. 그 뒤로 정정함

    COMMENT
     
    01
    12

    https://dlemrcnd.tistory.com/91


    DirectX11 3D - 반직선, 마우스 피킹, AABB 오브젝트 충돌처리 (Ray, Mouse Picking)

    3D 정점은 로컬 -> 월드 -> 뷰 -> 투영 -> 화면 좌표로 최종 변환이 된다. 마우스 피킹에서는 화면 좌표 -> 투영 - > 뷰 -> 월드 역순으로 돌아와야 한다. 화면 좌표계에서 있는 마우스 클릭, 그 위치에

    dlemrcnd.tistory.com

    이전 DX 프로젝트에서 AABB 충돌 구현을 했었다. 최근에 다시 작업할 일이 있어서 리마인드 겸 정리함

    AABB는 (Axis-Aligned Bounding Box)

    월드 좌표축 XYZ가 정렬된 박스로 회전이 없고 계산이 빠르다. 브로드 페이즈에 쓰이곤한다고 한다.
    Broad Phase -> 충돌했을 가능성이 낮은 pair를 골라내는 과정을 말한다.

    struct AABB
    {
        DD_Vector3 minPoint; // (x-, y-, z-)
        DD_Vector3 maxPoint; // (x+, y+, z+)
    };

    AABB vs AABB 충돌 판정은 아래와 같다.

    bool IntersectAABB(const AABB& a, const AABB& b)
    {
        if (a.maxPoint.x < b.minPoint.x || a.minPoint.x > b.maxPoint.x) return false;
        if (a.maxPoint.y < b.minPoint.y || a.minPoint.y > b.maxPoint.y) return false;
        if (a.maxPoint.z < b.minPoint.z || a.minPoint.z > b.maxPoint.z) return false;
        return true;
    }

    각 min max에 교차할 수 있는지 교차한다면 충돌로 판정한다. 비교적 간단하다. 


    OBB (Oriented Bounding Box)

    자기 자신의 로컬 축을 가지는 박스로 회전이 있다.
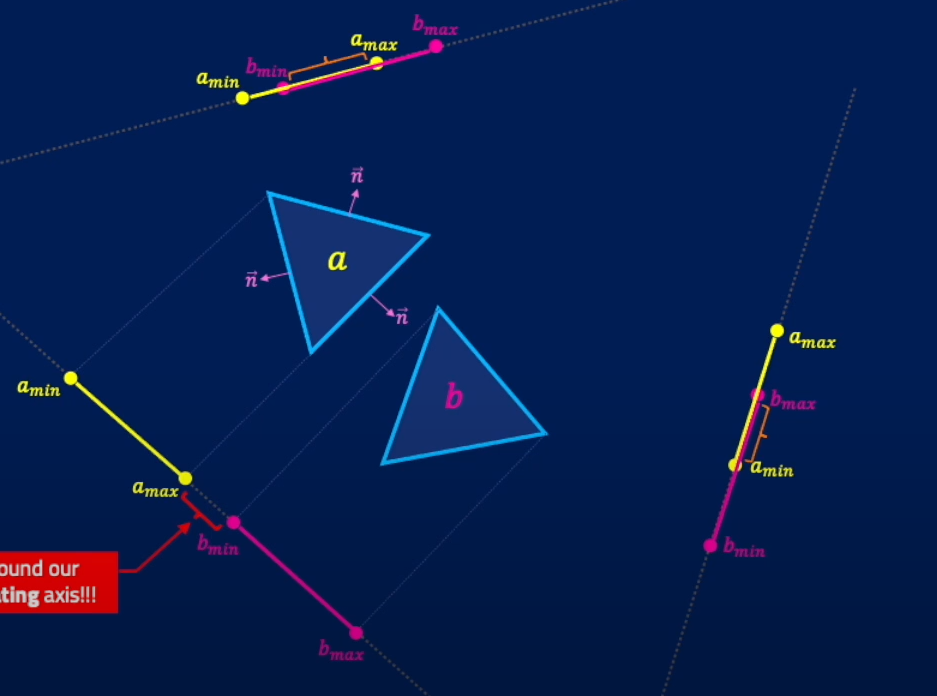
    SAT (Separating Axos Theorem) 기반 판정을 한다.

    출처 : https://kwonvector.tistory.com/59


    두 개의 볼록 도형(Convex Shape)이 충돌하지 않는다면
    반드시 두 도형을 완전히 분리할 수 있는 축(Separating Axis)이 하나 이상 존재한다.

    즉, 어떤 축 하나라도 두 도형을 그 축에 투영했을 때 투영된 구간이 겹치지 않으면
    → 두 도형은 충돌하지 않는다

    반대로 말하면, 모든 후보 축에서 투영 결과가 겹친다면
    → 충돌 상태라고 판단할 수 있다.

    OBB vs OBB 충돌에서는 다음 3가지 종류의 축을 모두 검사해야 한다.

    1. 첫 번째 OBB의 로컬 축 (3개)
    Right, Up, Forward

    2. 두 번째 OBB의 로컬 축 (3개)
    Right, Up, Forward

    3. 두 OBB의 로컬 축 간 외적(Cross Product) 축 (9개)
    이 부분이 SAT에서 가장 중요한 핵심이다.
    두 박스가 서로 회전된 상태일 때,
    각자의 면(face) 기준 축으로는 겹쳐 보이지만.. 
    실제로는 엣지(edge)끼리 엇갈려 충돌하지 않는 경우가 존재한다.

    이 경우 분리축은
    A 박스의 축 × B 박스의 축
    즉, 엣지와 엣지 사이에 수직인 방향이 된다.
    첫 번째 OBB 축이 3개, 두 번째 OBB 축도 3개이므로
    외적 조합은 다음과 같이 총 9개가 된다.

    3 × 3 = 9

    총합 15의 축이 필요하게 됨

    이 15개의 축 중
    단 하나라도 투영 결과가 겹치지 않으면 → 충돌이 아니다.
    모든 축에서 겹친다면 → 충돌 상태로 판단한다.

    struct OBB
    {
        DD_Vector3 centerPoint; // 중심점
        DD_Vector3 axis[3];    // 정규화된 로컬 축 (Right, Up, Forward)
        DD_Vector3 halfSize;   // 각 축 방향 반길이
    };


    // ========================================
    // OBB vs OBB Collision (SAT - Single Function)
    // ========================================
    bool IntersectOBB(const OBB& a, const OBB& b)
    {
        // 두 OBB 중심점 차이 벡터 - 중심 거리 > (A 투영 길이 + B 투영 길이)
        Vec3 centerDiff = b.center - a.center;
    
        // SAT에서 검사할 최대 15개의 분리축
        Vec3 axes[15];
        int axisCount = 0;
    
        // ----------------------------------------
        // 1️. a 로컬 축 (3개)
        // ----------------------------------------
        for (int i = 0; i < 3; ++i)
            axes[axisCount++] = a.axis[i];
    
        // ----------------------------------------
        // 2. b 로컬 축 (3개)
        // ----------------------------------------
        for (int i = 0; i < 3; ++i)
            axes[axisCount++] = b.axis[i];
    
        // ----------------------------------------
        // 3️. 두 OBB 로컬 축의 외적 (최대 9개)
        // ----------------------------------------
        for (int i = 0; i < 3; ++i)
        {
            for (int j = 0; j < 3; ++j)
            {
                Vec3 cross = Cross(a.axis[i], b.axis[j]);
    
                // 축이 거의 0이면 (서로 평행) 의미 없음
                if (cross.LengthSq() > DD_SMALL_NUMBER)
                    axes[axisCount++] = Normalize(cross);
            }
        }
    
        // ----------------------------------------
        // 모든 축에 대해 SAT 검사
        // ----------------------------------------
        for (int i = 0; i < axisCount; ++i)
        {
            const Vec3& axis = axes[i];
    
            // 중심점 거리 (두 OBB 중심을 축에 투영)
            float distance = fabs(Dot(centerDiff, axis));
    
            // OBB A를 축에 투영한 반 길이
            float projectionA =
                fabs(Dot(a.axis[0], axis)) * a.halfSize.x +
                fabs(Dot(a.axis[1], axis)) * a.halfSize.y +
                fabs(Dot(a.axis[2], axis)) * a.halfSize.z;
    
            // OBB B를 축에 투영한 반 길이
            float projectionB =
                fabs(Dot(b.axis[0], axis)) * b.halfSize.x +
                fabs(Dot(b.axis[1], axis)) * b.halfSize.y +
                fabs(Dot(b.axis[2], axis)) * b.halfSize.z;
    
            if (distance > (projectionA + projectionB))
            {
                // 하나라도 분리되는 축이 있으면 충돌 아님
                return false;
            }
        }
    
        // 모든 축에서 겹침 → 충돌
        return true;
    }

    충돌 처리된 오브젝트들은 처리는 아래와 같이 작업했다.


    MTV(Minimum Translation Vector) 연산 및 도형 이동

    두 도형사이의 관계가 서로 겹쳐진 관계라면 이제 겹쳐진 길이만큼 도형을 이동시켜야 한다. 
    도형을 이동시키기 위해 MTV를 구해서 이를 도형 이동에 적용해야 한다. 
    여기서 MTV는 겹쳐진 도형을 겹쳐지지 않은 상태가 되기 위한 최소한의 벡터를 말한다. 
    OBB에서는 SAT에서 계산된 각 분리축의 투영 겹침 길이 중 가장 작은 값을 가지는 축이 MTV를 결정한다.

    MTV의 방향 결정은 노말 즉, 부딪힌 오브젝트의 반대방향을 반환해서 이동시킨다.

    COMMENT
     
    12
    23

    C++ 공부하다 보면 RAII라는 말을 꼭 한 번은 듣게 된다.
    (Resource Acquisition Is Initialization)

    자원은 객체의 생명주기에 묶어서 관리하자

    • 객체가 생성될 때 자원을 얻고
    • 객체가 파괴될 때 자원을 해제한다

    파일, 메모리, 뮤텍스 같은 것들이 전부 대상이다.


    delete를 호출하면..

     
    Foo* foo = new Foo(); // ... delete foo;

    이 코드 자체는 틀리지 않는다.
    문제는 사람이 틀린다는 점이다.

    • 예외 터지면?
    • return 중간에 하면?
    • 누가 delete 해야 하는지 헷갈리면?

    결국 이런 코드가 된다.

    delete 했는지 안 했는지 알 수 없는 포인터
    RAII는 이걸 구조적으로 막을 수 있음
    이걸 가장 단순하게 보여주는 게 unique_ptr이다.

    UniquePtr – 소유자는 하나

    unique_ptr의 규칙은 명확하다. 소유자는 한명이다

    • 복사 ❌
    • 이동 ⭕
    • 소멸 시 자동 delete

    그래서 인터페이스도 이렇게 된다.

     
    	// 복사 생성자 대입연산자 삭제
    	DD_UniquePtr(const DD_UniquePtr& rhs) = delete;
    	DD_UniquePtr& operator= (const DD_UniquePtr& rhs) = delete;
    
    	DD_UniquePtr(DD_UniquePtr&& rhs) noexcept
    	{
    		this->m_pointer = rhs.m_pointer;
    		rhs.m_pointer = nullptr;
    		std::cout << "Move Constructor Called" << std::endl;
    	}
    	DD_UniquePtr& operator= (DD_UniquePtr&& rhs) noexcept
    	{
    		if (this != &rhs)
    		{
    			delete m_pointer;
    			m_pointer = rhs.m_pointer;
    			rhs.m_pointer = nullptr;
    		}
    
    		std::cout << "Move Assignment Operator Called" << std::endl;
    		return *this;
    	}

    이 한 줄만 봐도 의미가 전달된다.

    복사 대입 X 무조건 std::move를 통해 소유권 전달만 가능

    이동 생성자에서는 그냥 소유권만 넘긴다.
    스코프를 넘어가거나 들고있는 객체가 사라지게 되면 알아서 소멸자에서 delete를 해준다.
    왠만한건 다 유니크로 하면 될듯

    더보기
    #pragma once
    
    namespace DD
    {
    	template <class T>
    	class DD_UniquePtr
    	{
    	public:
    		T* m_pointer;
    	public:
    		void reset(T* _Ptr = nullptr) noexcept
    		{
    			if (_Ptr != m_pointer)
    			{
    				delete m_pointer;
    			}
    
    			m_pointer = _Ptr;
    		}
    	public:
    		DD_UniquePtr() {}
    		DD_UniquePtr(T* ptr) : m_pointer(ptr) {}
    		~DD_UniquePtr()
    		{
    			if (m_pointer != nullptr)
    				delete m_pointer;
    		}
    
    		// 복사 생성자 대입연산자 삭제
    		DD_UniquePtr(const DD_UniquePtr& rhs) = delete;
    		DD_UniquePtr& operator= (const DD_UniquePtr& rhs) = delete;
    
    		DD_UniquePtr(DD_UniquePtr&& rhs) noexcept
    		{
    			this->m_pointer = rhs.m_pointer;
    			rhs.m_pointer = nullptr;
    			std::cout << "Move Constructor Called" << std::endl;
    		}
    		DD_UniquePtr& operator= (DD_UniquePtr&& rhs) noexcept
    		{
    			if (this != &rhs)
    			{
    				delete m_pointer;
    				m_pointer = rhs.m_pointer;
    				rhs.m_pointer = nullptr;
    			}
    
    			std::cout << "Move Assignment Operator Called" << std::endl;
    			return *this;
    		}
    	};
    
    	template <class T, class... Args>
    	DD_UniquePtr<T> MakeUnique(Args... args)
    	{
    		return DD_UniquePtr<T>(new T(args...));
    	}
    }

    SharedPtr – 여러 곳에서 쓰는 경우

    unique_ptr처럼 “혼자만 쓰는 자원”이 아닐때 사용

    • 여러 시스템이 같은 객체를 참조
    • 생존 시점을 명확히 정하기 어려운 경우

    이럴 때는 shared_ptr이 필요해진다.


    참조 카운트 Control Block 하나로 해결

    • 실제 객체 포인터
    • refCount를 가진 ControlBlock
    	struct ControlBlock
    	{
    		int refCount = 1;
    	};

    복사될 때 증가
    소멸될 때 감소
    0이 되면 자원 해제

    	void Release()
    	{
    		if (m_control)
    		{
    			--m_control->refCount;
    
    			if (m_control->refCount == 0)
    			{
    				delete m_pointer;
    				delete m_control;
    			}
    		}
    
    		m_pointer = nullptr;
    		m_control = nullptr;
    	}

    참조 카운트로 누가 이 메모리를 참조하고 있는지 카운팅한다.
    순환 참조 문제는 있긴한데 weak_ptr 과 함께 나중에 다루도록..하겠다. 

    더보기
    #pragma once
    #include <iostream>
    
    namespace DD
    {
    	template <class T>
    	class DD_SharedPtr
    	{
    	private:
    		struct ControlBlock
    		{
    			int refCount = 1;
    		};
    
    		T* m_pointer = nullptr;
    		ControlBlock* m_control = nullptr;
    
    	public:
    		DD_SharedPtr() {}
    		explicit DD_SharedPtr(T* ptr)
    			: m_pointer(ptr)
    		{
    			if (ptr)
    				m_control = new ControlBlock();
    		}
    		~DD_SharedPtr()
    		{
    			Release();
    		}
    
    		DD_SharedPtr(const DD_SharedPtr& rhs)
    		{
    			m_pointer = rhs.m_pointer;
    			m_control = rhs.m_control;
    
    			if (m_control)
    				++m_control->refCount;
    
    			std::cout << "Copy Constructor Called (refCount = "
    				<< use_count() << ")\n";
    		}
    
    		DD_SharedPtr& operator=(const DD_SharedPtr& rhs)
    		{
    			if (this != &rhs)
    			{
    				Release();
    
    				m_pointer = rhs.m_pointer;
    				m_control = rhs.m_control;
    
    				if (m_control)
    					++m_control->refCount;
    			}
    
    			std::cout << "Copy Assignment Operator Called (refCount = "
    				<< use_count() << ")\n";
    			return *this;
    		}
    
    		DD_SharedPtr(DD_SharedPtr&& rhs) noexcept
    		{
    			m_pointer = rhs.m_pointer;
    			m_control = rhs.m_control;
    
    			rhs.m_pointer = nullptr;
    			rhs.m_control = nullptr;
    
    			std::cout << "Move Constructor Called\n";
    		}
    
    		DD_SharedPtr& operator=(DD_SharedPtr&& rhs) noexcept
    		{
    			if (this != &rhs)
    			{
    				Release();
    
    				m_pointer = rhs.m_pointer;
    				m_control = rhs.m_control;
    
    				rhs.m_pointer = nullptr;
    				rhs.m_control = nullptr;
    			}
    
    			std::cout << "Move Assignment Operator Called\n";
    			return *this;
    		}
    
    	public:
    		void reset(T* ptr = nullptr)
    		{
    			Release();
    
    			if (ptr)
    			{
    				m_pointer = ptr;
    				m_control = new ControlBlock();
    			}
    		}
    
    		int use_count() const
    		{
    			return m_control ? m_control->refCount : 0;
    		}
    
    		T* get() const { return m_pointer; }
    		T& operator*() const { return *m_pointer; }
    		T* operator->() const { return m_pointer; }
    
    	private:
    		void Release()
    		{
    			if (m_control)
    			{
    				--m_control->refCount;
    
    				if (m_control->refCount == 0)
    				{
    					delete m_pointer;
    					delete m_control;
    				}
    			}
    
    			m_pointer = nullptr;
    			m_control = nullptr;
    		}
    	};
    
    	template <class T, class... Args>
    	DD_SharedPtr<T> MakeShared(Args... args)
    	{
    		return DD_SharedPtr<T>(new T(args...));
    	}
    }


    RAII를 머리로만 이해할 때는 “자동으로 정리해준다” 정도로 생각했는데,
    스마트 포인터를 직접 구현해보니까 되게 단순한 구조로 되어있다는 생각이 든다.

    • 생성자 = 자원 획득
    • 소멸자 = 자원 해제

    정리

    • RAII는 “자원을 객체 생명주기에 묶자”는 원칙
    • UniquePtr → 단일 소유
    • SharedPtr → 다중 소유 + 참조 카운트
    • 스마트 포인터는 RAII의 가장 대표적인 구현
    COMMENT
     
    12
    23

    C++에서는 std::unordered_map이라는 해시 테이블을 제공한다.
    하지만 실제로 해시 충돌이 어떻게 처리되는지, rehash는 언제 발생하는지,
    load factor는 어떤 의미를 가지는지 구현하면서 이해하는 과정.
    그래서 이번 글에서는 체이닝 방식을 사용하는 HashMap을 직접 구현하며 내부 동작을 정리해본다.

    구현된 HashMap은 Separate Chaining(체이닝) 방식을 사용한다.
    해시 충돌이 발생했을 때, 같은 버킷에 속한 요소들을 연결 리스트로 관리하는 방식이다.

    전체 구조는 다음과 같다.

    DD_HashMap
     ├─ vector<DD_HashBucket>
     │    ├─ dummy head node
     │    └─ linked list (DD_HashNode)
     └─ hash<Key> + modulo bucket size

    구현의 핵심 요소는 아래 세 가지다.

    1. 버킷 배열: std::vector<DD_HashBucket>
    2. 충돌 처리 방식: 연결 리스트(Separate Chaining)
    3. Rehash 조건: Load Factor(적재율)


    1. 버킷 배열 (Bucket Array)

    HashMap은 내부적으로 고정된 크기의 버킷 배열을 가진다.
    각 Key는 해시 함수를 통해 하나의 버킷 인덱스로 매핑된다.

    uint64_t GenerateHash(const Key& key, const std::vector<BucketType>& bucket)
    {
        std::hash<Key> hasher;
        return hasher(key) % bucket.size();
    }


    • std::hash<Key>를 사용해 Key를 해시값으로 변환
    • 현재 버킷 개수로 나머지 연산을 하여 인덱스를 결정
    • Key 타입은 std::hash가 정의되어 있어야 한다


    2. 해시 충돌 처리 – Separate Chaining

    서로 다른 Key라도 같은 해시 값을 가질 수 있다.
    이 문제를 **해시 충돌(Hash Collision)**이라고 한다.

    이번 구현에서는 Separate Chaining 방식을 사용했다.
    즉, 같은 버킷에 매핑되는 요소들은 연결 리스트로 관리된다.

    DD_HashNode

    template<typename Key, typename Value>
    class DD_HashNode
    {
        Key m_key;
        Value m_value;
        DD_HashNode* m_next;
    };


    각 노드는 Key / Value 쌍과 다음 노드를 가리키는 포인터를 가진다.

    버켓에는 dummy head node가 있음, 노드는 항상 이 head 뒤에 추가된다.


    3. Load Factor와 Rehash

    HashMap의 성능은 Load Factor(적재율) 에 크게 영향을 받는다.

     
    load factor = (현재 저장된 요소 수) / (버킷 개수)

    Load Factor가 높아질수록:

    • 한 버킷에 많은 노드가 몰림
    • 연결 리스트 탐색 비용 증가
    • 평균 시간 복잡도가 O(1)에서 멀어짐

    Rehash 조건

     
    constexpr float CHECK_MAXLOAD = 0.8f;
     
    if (loadFactor >= CHECK_MAXLOAD) { Rehash(bucketSize * 2); }

    Load Factor가 0.8 이상이 되면 Rehash를 수행하도록 구현했다.


    Rehash 과정

    Rehash는 다음 순서로 진행된다.

    1. 기존보다 큰 버킷 배열 생성
    2. 모든 기존 노드를 순회
    3. 새로운 버킷 크기에 맞게 해시 값을 다시 계산
    4. 노드를 새 버킷으로 이동
    5. 기존 버킷과 swap
    void Rehash(int32_t newSize)
    {
        std::vector<BucketType> newBucket(newSize);
    
        for (int idx = 0; idx < m_bucket.size(); ++idx)
        {
            NodeType* currentNode = m_bucket[idx].GetHead();
            m_bucket[idx].SetHead(nullptr);
    
            while (currentNode)
            {
                NodeType* nextNode = currentNode->GetNext();
                currentNode->SetNext(nullptr);
    
                uint64_t newIdx = GenerateHash(currentNode->GetKey(), newBucket);
                newBucket[newIdx].AddNode(currentNode);
    
                currentNode = nextNode;
            }
        }
        m_bucket.swap(newBucket);
    }

    Rehash의 시간 복잡도는 O(n) 이지만,
    자주 발생하지 않도록 설계되었기 때문에 전체 평균 성능에는 큰 영향을 주지 않을 것 같다.


    시간 복잡도 정리

    연산평균최악
    Insert O(1) O(n)
    Find O(1) O(n)
    Delete O(1) O(n)
    Rehash O(n) O(n)

    마무리

    이번 구현을 통해 단순히 unordered_map을 사용하는 것을 넘어,
    해시 충돌 처리 방식, Load Factor의 의미, Rehash가 필요한 이유를
    구현 관점에서 이해할 수 있었다.

    표준 컨테이너는 대부분 이런 복잡한 과정을 내부에서 처리해주지만,
    직접 구현해보면 자료구조의 특성과 한계를 훨씬 명확하게 체감할 수 있다.

    다음에는 Open Addressing 방식이나
    메모리 관리 개선(unique_ptr, allocator) 등을 적용해볼 예정이다.

    더보기

    전체 코드

    #pragma once
    #include <iostream>
    #include <string>
    #include <vector>
    
    // --------------------------------------------------------------------------------------------
    // DD_HashNode
    // --------------------------------------------------------------------------------------------
    
    template<typename Key, typename Value>
    class DD_HashNode
    {
    public:
    	void SetNext(DD_HashNode* node) { m_next = node; }
    	void SetValue(const Value& value) { m_value = value; }
    
    	DD_HashNode* GetNext() const { return m_next; }
    	const Key& GetKey() const { return m_key; }
    	Value& GetValue() { return m_value; }
    
    public:
    	DD_HashNode(const Key& key, const Value& value) : m_key(key), m_value(value), m_next(nullptr) {}
    	DD_HashNode() : m_key(), m_value(), m_next(nullptr) {}
    
    private:
    	Key m_key{};
    	Value m_value{};
    	class DD_HashNode* m_next = nullptr;
    };
    
    // --------------------------------------------------------------------------------------------
    // DD_HashBucket
    // --------------------------------------------------------------------------------------------
    
    template<typename Key, typename Value>
    class DD_HashBucket
    {
    	using NodeType = DD_HashNode<Key, Value>;
    public:
    	void AddNode(NodeType* addingNode)
    	{
    		if (nullptr == addingNode)
    			return;
    
    		NodeType* movingNode = m_head->GetNext();
    		m_head->SetNext(addingNode);
    		addingNode->SetNext(movingNode);
    		++m_size;
    	}
    
    	void DeleteNode(const Key& key)
    	{
    		NodeType* prev = m_head;
    		NodeType* node = m_head->GetNext();
    
    		while (node != nullptr)
    		{
    			if (node->GetKey() == key)
    			{
    				prev->SetNext(node->GetNext());
    				delete node;
    				--m_size;
    				return;
    			}
    			prev = node;
    			node = node->GetNext();
    		}
    	}
    
    	NodeType* FindNode(const Key& key) const
    	{
    		NodeType* node = m_head->GetNext();
    		while (node != nullptr)
    		{
    			if (node->GetKey() == key)
    				return node;
    
    			node = node->GetNext();
    		}
    		return nullptr;
    	}
    
    	void GetElements(std::vector<std::pair<Key, Value>>& outElements)
    	{
    		outElements.clear();
    		outElements.reserve(m_size);
    
    		NodeType* node = m_head->GetNext();
    		while (node != nullptr)
    		{
    			outElements.emplace_back(node->GetKey(), node->GetValue());
    			node = node->GetNext();
    		}
    	}
    
    	void SetHead(NodeType* NewNode) { m_head = NewNode; }
    	NodeType* GetHead() const { return m_head; }
    	NodeType* GetNext() const { return m_head ? m_head->GetNext() : nullptr; }
    	int32_t Size() const { return m_size; }
    
    	void Print()
    	{
    		NodeType* node = m_head->GetNext();
    		while (node != nullptr)
    		{
    			std::cout << node->GetValue() << " ";
    			node = node->GetNext();
    		}
    	}
    public:
    	DD_HashBucket() : m_size(0), m_head(nullptr)
    	{
    		m_head = new NodeType();
    	}
    
    	~DD_HashBucket()
    	{
    		NodeType* node = m_head;
    		while (node != nullptr)
    		{
    			NodeType* next = node->GetNext();
    			delete node;
    			node = next;
    		}
    	}
    private:
    	int32_t m_size = 0;
    	NodeType* m_head = nullptr;
    };
    
    // --------------------------------------------------------------------------------------------
    // DD_HashMap
    // --------------------------------------------------------------------------------------------
    
    constexpr int32_t BUCKET_SIZE = 16;
    constexpr float CHECK_MAXLOAD = 0.8f;
    
    template<typename Key, typename Value>
    class DD_HashMap
    {
    	using BucketType = DD_HashBucket<Key, Value>;
    	using NodeType = DD_HashNode<Key, Value>;
    public:
    	void Insert(const Key& key, const Value& val)
    	{
    		if (CheckLoadFactor())
    		{
    			size_t bucketSize = m_bucket.size();
    			Rehash(bucketSize * 2);
    		}
    		Insert_Internal(key, val);
    	}
    
    	void Delete(const Key& key)
    	{
    		uint64_t idx = GenerateHash(key, m_bucket);
    		m_bucket[idx].DeleteNode(key);
    		m_size--;
    	}
    
    	Value& Find(const Key& key)
    	{
    		uint64_t idx = GenerateHash(key, m_bucket);
    		NodeType* found = m_bucket[idx].FindNode(key);
    		return found->GetValue();
    	}
    
    	Value& operator[](const Key& key)
    	{
    		Insert(key, Value{}); // try - emplace
    		return Find(key);
    	}
    
    	void GetAllElements(std::vector<std::pair<Key, Value>>& outElements)
    	{
    		size_t bucketSize = m_bucket.size();
    
    		outElements.clear();
    		outElements.reserve(bucketSize);
    
    		for (int idx = 0; idx < bucketSize; ++idx)
    		{
    			std::vector<std::pair<Key, Value>> bucketElements;
    			m_bucket[idx].GetElements(bucketElements);
    			outElements.insert(outElements.end(), bucketElements.begin(), bucketElements.end());
    		}
    	}
    
    	void Print()
    	{
    		size_t bucketSize = m_bucket.size();
    		for (int idx = 0; idx < bucketSize; ++idx)
    		{
    			std::cout << "[" << idx << "] ";
    			m_bucket[idx].Print();
    			std::cout << "\n";
    		}
    	}
    
    	size_t Size() { return m_size; }
    
    private:
    	uint64_t GenerateHash(const Key& key, const std::vector<BucketType>& bucket)
    	{
    		std::hash<Key> hasher;
    		uint64_t Hash = hasher(key) % bucket.size();
    		return Hash;
    	}
    
    	bool CheckLoadFactor()
    	{
    		int32_t bucketSize = m_bucket.size();
    		float loadFactor = (static_cast<float>(m_size) / static_cast<float>(bucketSize));
    		//std::cout << "item size :" << m_size << ", bucket size :" << bucketSize << ", load factor :" << loadFactor << std::endl;
    		return loadFactor >= CHECK_MAXLOAD;
    	}
    
    	void Rehash(int32_t newSize)
    	{
    		std::vector<BucketType> newBucket(newSize);
    		for (int idx = 0; idx < m_bucket.size(); ++idx)
    		{
    			NodeType* currentNode = m_bucket[idx].GetHead();
    			m_bucket[idx].SetHead(nullptr);
    			while (currentNode)
    			{
    				NodeType* nextNode = currentNode->GetNext();
    				currentNode->SetNext(nullptr);
    
    				uint64_t newIdx = GenerateHash(currentNode->GetKey(), newBucket);
    				newBucket[newIdx].AddNode(currentNode);
    
    				currentNode = nextNode;
    			}
    		}
    		m_bucket.swap(newBucket);
    	}
    
    	void Insert_Internal(const Key& key, const Value& val)
    	{
    		uint64_t idx = GenerateHash(key, m_bucket);
    		if (NodeType* found = m_bucket[idx].FindNode(key))
    		{
    			return;
    		}
    
    		NodeType* newNode = new NodeType(key, val);
    		m_bucket[idx].AddNode(newNode);
    		m_size++;
    	}
    
    public:
    	DD_HashMap() : m_bucket(BUCKET_SIZE), m_size(0) {}
    	DD_HashMap(int32_t bucketSize) : m_bucket(bucketSize), m_size(0) {}
    	~DD_HashMap() {}
    
    private:
    	std::vector<BucketType> m_bucket{};
    	int32_t m_size = 0;
    };
    COMMENT
     
    07
    07

    https://github.com/jiwonchoidd/UE5_GasTutorial


    GAS는 게임플레이 어빌리티 시스템(Gameplay Ability System)의 약자로, 주로 언리얼 엔진(Unreal Engine)에서 사용되는 강력한 프레임워크입니다

    GAS의 핵심 구성 요소 3가지

    1. 어트리뷰트 (Attributes)
      • 캐릭터의 능력치(스탯)입니다.
      • 예: 체력(Health), 마나(Mana), 공격력(AttackPower), 이동속도(MoveSpeed) 등.
      • 이 값들은 다른 요소들에 의해 실시간으로 변경됩니다.
    2. 어빌리티 (Abilities)
      • 캐릭터가 사용할 수 있는 액션이나 스킬입니다.
      • 예: 파이어볼 발사, 칼 휘두르기, 회복 물약 마시기.
      • 어빌리티는 발동 조건(마나 소모 등), 쿨타임, 실행 로직 등을 가집니다.
    3. 게임플레이 이펙트 (Gameplay Effects)
      • 어트리뷰트를 변경하는 역할을 합니다. 즉, 버프와 디버프를 구현합니다.
      • 예:
        • 힘 증가 버프: 30초 동안 공격력 어트리뷰트를 +10 증가시킴.
        • 독 디버프: 5초 동안 매초 체력 어트리뷰트를 -5 감소시킴.
        • 힐: 체력 어트리뷰트를 즉시 +100 회복시킴.


    https://youtu.be/Fb5y4PWtud8?si=UgFUTJs7BOo2q-OS


    1. 예제 프로젝트 구성

    	// add build.cs
    	PublicDependencyModuleNames.AddRange(new string[] {
    			/...
    			"GameplayAbilities",
    			"GameplayTags",
    			"GameplayTasks",
    			.../
    		});
            
    	// add .uproject
    			"Plugins": [
    		/...
    		{
    			"Name": "GameplayAbilities",
    			"Enabled": true
    		}

    Ability System을 사용하기 위해 플러그인 추가를 합니다.


    2. Game Ability 생성

    UGameAbility를 상속받는 클래스로 Ability 객체 생성

    void UGWAbility_Jump::ActivateAbility(const FGameplayAbilitySpecHandle Handle, const FGameplayAbilityActorInfo* ActorInfo, const FGameplayAbilityActivationInfo ActivationInfo, const FGameplayEventData* TriggerEventData)
    {
    	if (!ActorInfo->AvatarActor.IsValid())
    		return;
    
    	ACharacter* Character = Cast<ACharacter>(ActorInfo->AvatarActor.Get());
    	if (nullptr == Character)
    		return;
    
    #if WITH_EDITOR
    	GEngine->AddOnScreenDebugMessage(-1, 1.f, FColor::Red, TEXT("UGWAbility_Jump::ActivateAbility"));
    #endif
    	Character->Jump();
    
    	EndAbility(Handle, ActorInfo, ActivationInfo, true, false);
    }

    해당 함수를 오버라이딩해서 Jump 능력을 사용할 수 있도록 구성합니다.

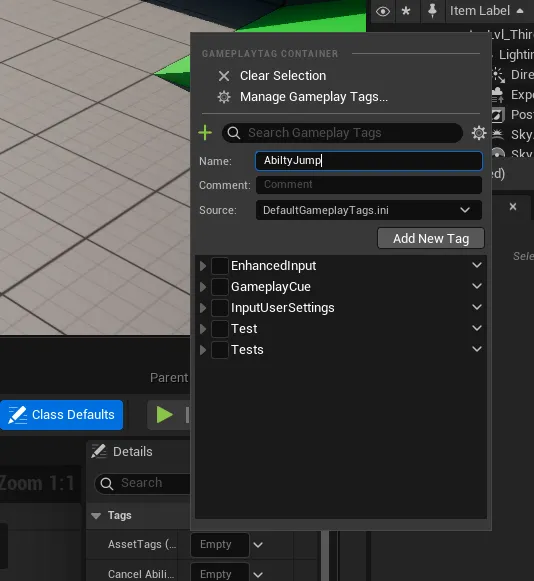
    이 클래스를 상속받는 BP 에셋을 생성하고 + 버튼을 눌러서 Ability 태그를 지정합니다.

    아래는 어빌리티 관련된 주요 함수들

    엔진 코드
    	//	The important functions:
    	//	
    	//		CanActivateAbility()	- const function to see if ability is activatable. Callable by UI etc
    	//
    	//		TryActivateAbility()	- Attempts to activate the ability. Calls CanActivateAbility(). Input events can call this directly.
    	//								- Also handles instancing-per-execution logic and replication/prediction calls.
    	//		
    	//		CallActivateAbility()	- Protected, non virtual function. Does some boilerplate 'pre activate' stuff, then calls ActivateAbility()
    	//
    	//		ActivateAbility()		- What the abilities *does*. This is what child classes want to override.
    	//	
    	//		CommitAbility()			- Commits reources/cooldowns etc. ActivateAbility() must call this!
    	//		
    	//		CancelAbility()			- Interrupts the ability (from an outside source).
    	//
    	//		EndAbility()			- The ability has ended. This is intended to be called by the ability to end itself.
    	//	
    	// ----------------------------------------------------------------------------------------------------------------


    3. 캐릭터 GameAbilitySystem 구현

    마찬가지로 UAbilitySystemComponent를 상속받는 클래스를 하나 생성해주고 해당 캐릭터 컴포넌트를 사용할 캐릭터 생성자에 추가합니다.

    // Create a AbilitySystem
    AbilitySystem = CreateDefaultSubobject<UGWAbilitySystemComponent>(TEXT("AbilitySystem"));

    캐릭터에는 능력 관련된 입력 바인딩 정보, 능력 부여하는 코드 작성하면 됩니다.

    3-1. 입력 바인딩 정보

    Confirm 어빌리티의 타켓팅을 확정하고 최종 실행하라는 신호

    Cancel 진행중인 어빌리티를 취소하라는 신호.

    SetupPlayerInputCompoent 실행 시 관련되어 정의한 Enum Path 등 구조체를 넘겨 입력 바인딩을 등록함

    void AGasTutorialCharacter::SetupPlayerInputComponent(UInputComponent* PlayerInputComponent)
    {
    	// Set up action bindings
    	if (UEnhancedInputComponent* EnhancedInputComponent = Cast<UEnhancedInputComponent>(PlayerInputComponent)) {
    		...
    		if(AbilitySystem)
    		{
    			// 5.1 Enum 네임 -> Enum 경로로 변경됨
    			FGameplayAbilityInputBinds InputBind = FGameplayAbilityInputBinds(
    				TEXT("Confirm"),
    				TEXT("Cancel"),
    				FTopLevelAssetPath(StaticEnum<EGasAbilityInputId>()->GetPathName()),
    				static_cast<int32>(EGasAbilityInputId::Confirm),
    				static_cast<int32>(EGasAbilityInputId::Cancel));
    
    			AbilitySystem->BindAbilityActivationToInputComponent(PlayerInputComponent, InputBind);
    		}
    	}

    3-2. 캐릭터 능력 등록

    // BP 에서 지정할 수 있게 능력 TSubClassOf로 구현
    UPROPERTY(EditAnywhere, BlueprintReadWrite, Category= "GWAbility")
    TArray<TSubclassOf<class UGameplayAbility>> DefaultAbilities;
    
    
    void AGasTutorialCharacter::BeginPlay()
    {
    	Super::BeginPlay();
    
    	if (AbilitySystem)
    	{
    		for (TSubclassOf<UGameplayAbility>& Ability : DefaultAbilities)
    		{
    			if (!Ability)
    				continue;
    
    			AbilitySystem->GiveAbility(
    				FGameplayAbilitySpec(Ability, 1, static_cast<int32>(EGasAbilityInputId::Confirm), this));
    		}
    	}
    }

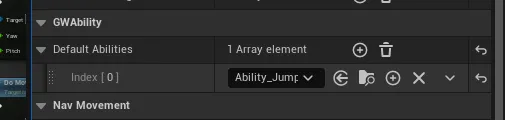
    캐릭터 BP 에서 아까 만든 Jump 어빌리티를 등록해놓고 캐릭터의 BeginPlay 시점에 능력을 부여합니다.


    4. 능력 사용 

    간단히 블루프린트로 AnyKey 입력 시 능력 사용하도록 구현합니다.

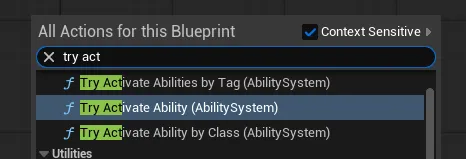
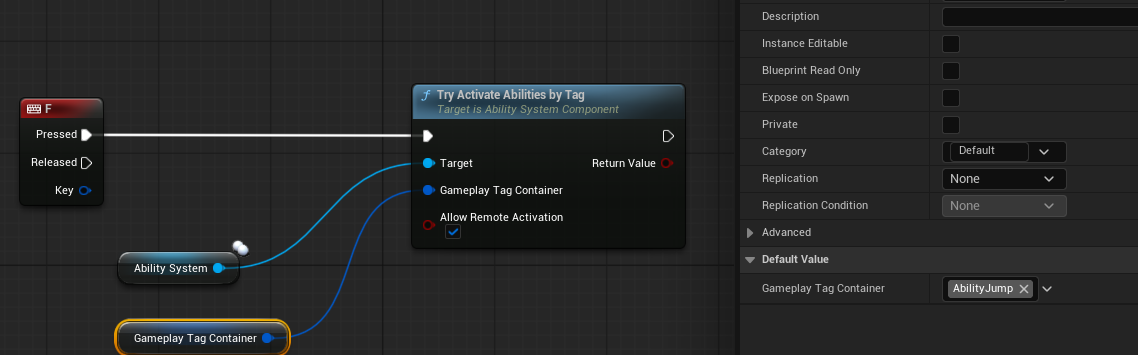
    관련되어서 3개 함수가 보였네요. 각각 태그, 클래스, 핸들로 능력 사용하는걸로 보입니다.

    태그로 F 버튼 입력 시 호출하도록 구현했습니다.

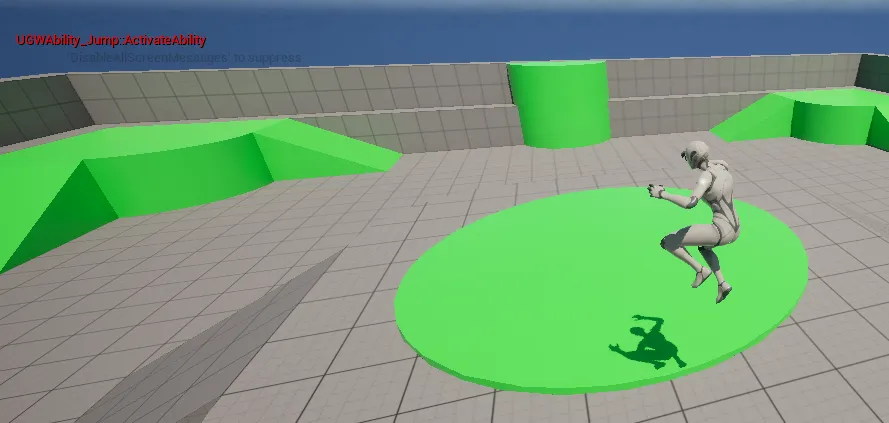
    점프하고 있는 모습


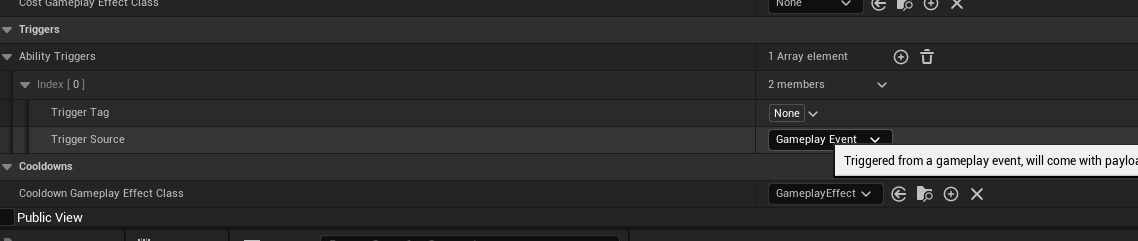
    트리거나 쿨타임 기능도 있으니 추후 사용해볼 예정


    COMMENT
     
    09
    16

    언리얼에서 제공하지 않거나 커스터마이징 해야 할 때, 언리얼 풀 소스를 수정할 필요가 있다.

    나 같은 경우에는 IOS에서 홈바 처리로 인해 풀소스 빌드를 해보았다.


    https://www.unrealengine.com/en-US/ue-on-github

    언리얼에 깃허브 계정 등록 후 원하는 엔진 버젼의 레포지를 다운로드한다.

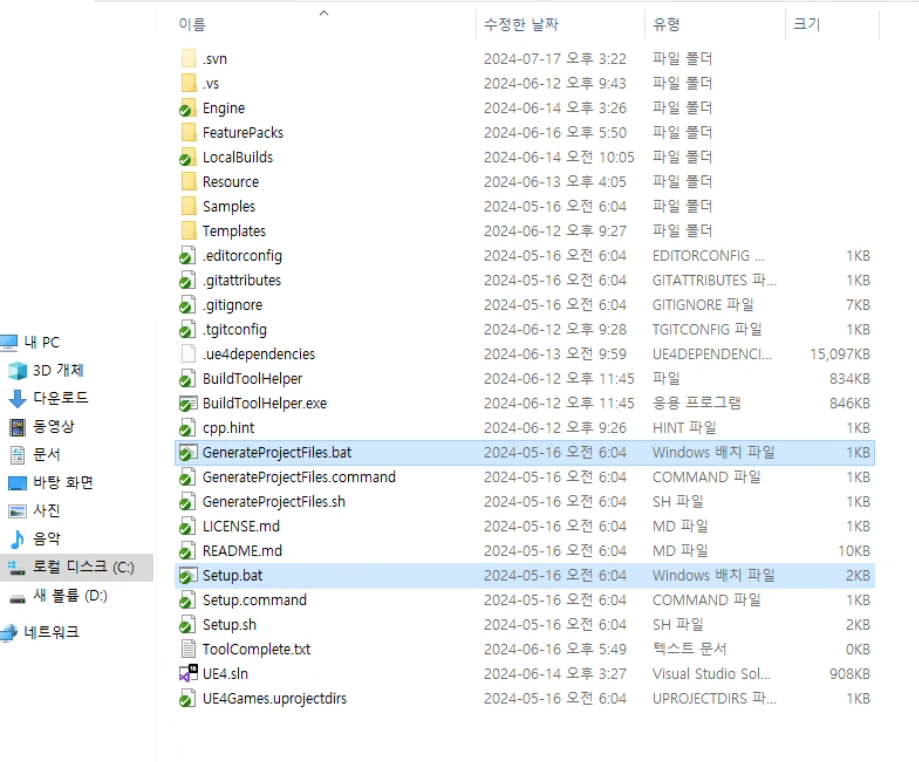
    받고 나면 Setup.bat, GenerateProjectFile.bat를 실행한다.


    각각 실행 의존성 파일 설치와 프로젝트 파일 생성을 하게 되는데,

    빌드를 하기 위해 필요한 필수 과정들이다.


    언리얼 프로젝트처럼GenerateProjectFile 실행파일은 컴파일된 오브젝트 파일

    에셋 레지스트리, 프로젝트 파일 등을 생성해 각 작업자가 실행해 주면 되기 때문에

    형상 관리 프로그램에서는 Setup.bat 이후로 다 추가해 주면 된다.


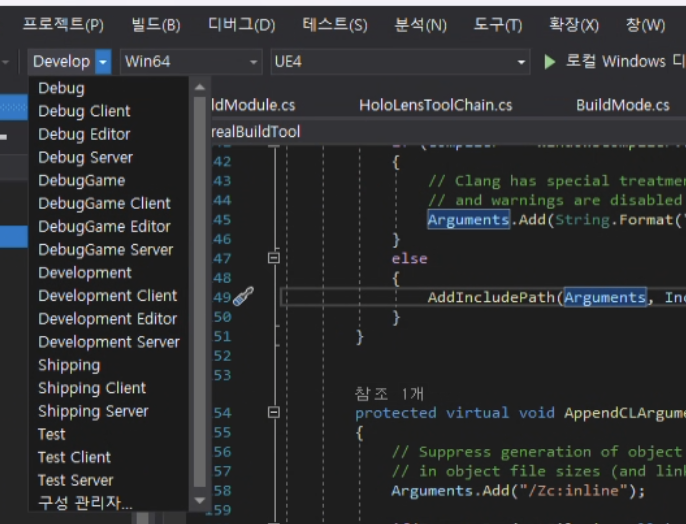
    그럼 .sln 파일로 엔진 소스를 켜서 DevelopmentEditor + {OS} + Ue4 로 빌드를 하면 된다.

    한참 뒤에 빌드가 완료되면 에디터가 켜지게 될 것이다.

    만약 빌드 결과물을 소스 제어 할 경우에는 Engine/Binaries 디렉터리를 등록하면 됨.

    과정에서 임시파일이나 Intermediate 폴더 (플러그인 폴더 포함)는 소스 제어 제외 시켜주자.


    이렇게 소스 엔진 폴더 내 빌드된 결과물로 협업을 하려면 관리가 어렵고 소스 용량이 크기 때문에

    엔진 관리 레포지 <-> 엔진 결과물 레포지로 나누는 것이 좋다.


    엔진팀에서는 엔진만 관리하고, 프로젝트 팀에서는 배포된 엔진 파일을 통해, 프로젝트 작업을 할 수 있을 것이다.

    InstalledBuild, Unreal Build Graph 개념으로 언리얼 허브에서 받는

    제공되는 엔진 결과물을 만드는 과정이라고 생각하면 편하다.  


    https://dev.epicgames.com/documentation/ko-kr/unreal-engine/using-an-installed-build?application_version=4.27


    BuildGraph, 빌드 스크립트를 명령을 통해서 설치 빌드를 뽑아내면 되는데

    1. Engine/Build/InstalledEngineBuild.xml 명령어 확인

    2. Automation Tool 호출을 통해 빌드 스크립트 실행 -> 빌드 운영체재 지정

    3. 별도로 지정하지 않은 경우 해당 엔진 디렉터리의 LocalBuilds/Engine/ 폴더에 설치 빌드 생성 완료


    명령어 예시

    [IOS]

    "{EnginePath}/Engine/Build/BatchFiles/RunUAT.sh" BuildGraph -target="Make Installed Build Mac" -script="Engine/Build/InstalledEngineBuild.xml" -set:HostPlatformOnly=true -set:WithDDC=false -set:SignExecutables=false -set:WithWin64=false -set:WithAndroid=false -set:WithLinux=false -set:WithMac=true -set:WithIOS=true -clean

    [AOS]

    "{EnginePath}/Engine/Build/BatchFiles/RunUAT.bat" BuildGraph -target="Make Installed Build Win64" -script="Engine/Build/InstalledEngineBuild.xml" -set:HostPlatformOnly=true -set:WithDDC=false -set:SignExecutables=false -set:WithWin64=true -set:WithAndroid=true -set:WithLinux=false -set:WithMac=false -set:WithIOS=false -clean


    어떤 환경의 설치 빌드를 만드는지, 사용할 빌드 스크립트 지정, 그밖에 파라미터를 통해

    설치 빌드를 만드는 오토메이션 툴을 통해 명령한다.

    InstalledEngineBuild.xml 파일을 까서 보면 "Make Installed Build Win64" 등 각 옵션에 따른 값을 확인

    각 플랫폼, 운영체제에 따른 옵션 및 파라미터를 설정할 수 있다.


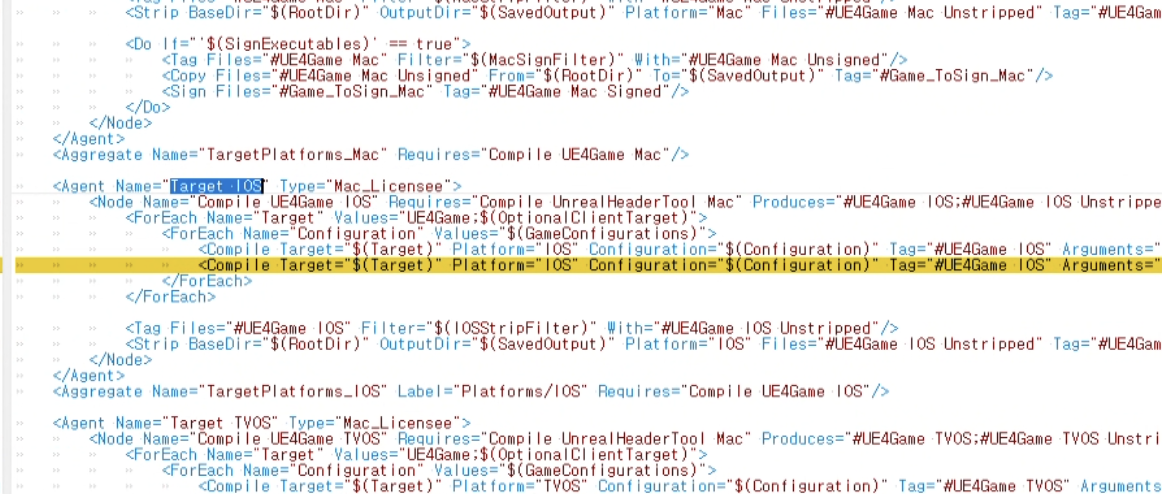
    만약에 특정 os에서 빌드 실패 시 InstalledEngineBuild.xml  직접 수정을 해야 할 일이 생길 수도 있다. 


    https://forums.unrealengine.com/t/4-24-installed-build-ios-fails-bcz-of-unable-to-find-valid-certificate-mobile-provision-pair/140208


    4.24: installed build ios fails bcz of ¨Unable to find valid certificate/mobile provision pair¨

    my cmd: [TABLE] /Users/xxxx/Desktop/xxxxxx4.24/Engine/Build/BatchFiles/RunUAT.command BuildGraph -target=“Make Installed Build Mac” -script=Engine/Build/InstalledEngineBuild.xml -set:WithWin64=false -set:WithWin32=false -set:WithMac=false -set:WithAndr

    forums.unrealengine.com


    나 같은 경우에도 ios 설치 빌드가 뽑히지 않아서 아래와 같이 수정했었다. -createstub 삭제 후 성공적으로 설치빌드가 되었었다. 

    운영체제 또는 버전에 따라 나타날 수 있는 여러 가지 변수들이 있기 때문에, 차근히 여유를 가지고 작업하는 게 좋을 것 같다..

    COMMENT
     
    03
    04

    Verse 코드로 선택한 바닥 매쉬를 등록해

    순차적으로 사라지게 하는 디바이스를 만들어보자.

    https://dev.epicgames.com/documentation/ko-kr/uefn/synchronized-disappearing-platforms-using-verse-in-unreal-editor-for-fortnite


    동기화된 사라지는 플랫폼

    Verse를 사용하여 차례대로 나타나면서 사라지는 징검다리 플랫폼을 하나의 장치로 구현합니다.

    dev.epicgames.com


    우선 등록할 바닥 매쉬를 생성해주어야 하는데, 위 예제에서는 색상 변경 바닥 디바이스? 

    미리 구현되어 있는 바닥을 이용해서 사라지는 플랫폼을 구현하는데,


    좀 더 커스텀할 수 있게 BP나 디바이스를 만드는 게 더 좋아 보여서 BP로 만들려고 한다.

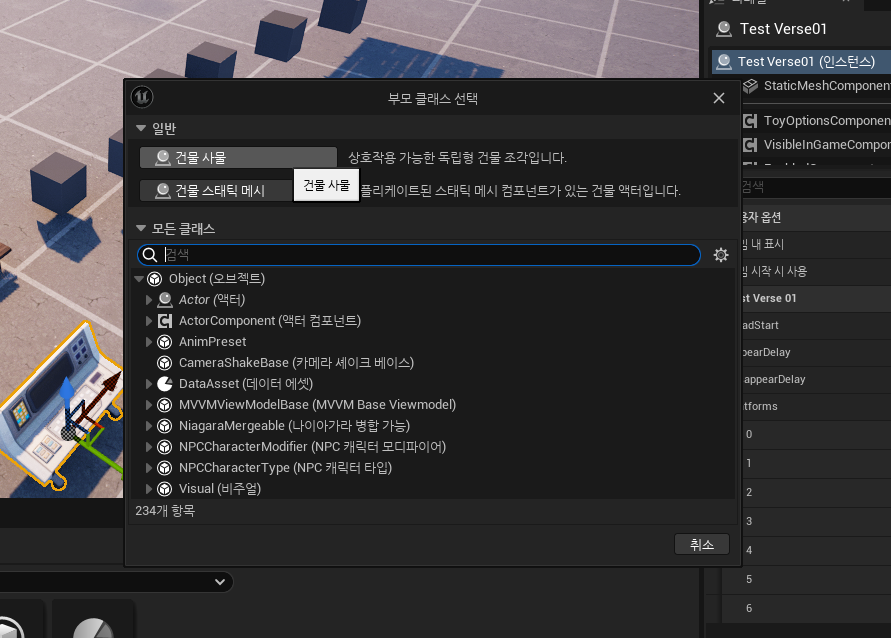
     언리얼 엔진보다 한정적인 모습을 볼 수 있다. 건물 사물, 건물 스테틱 메시가 있는데,

    건물 사물을 "독립적인" 사물로 정적 매쉬라는 용어 자체가 고정되어 조작 불가란 의미가 있기 때문에

    건물 사물이 좀 더 바닥으로 쓰기 맞아 보인다. 이걸로 생성해 준다.


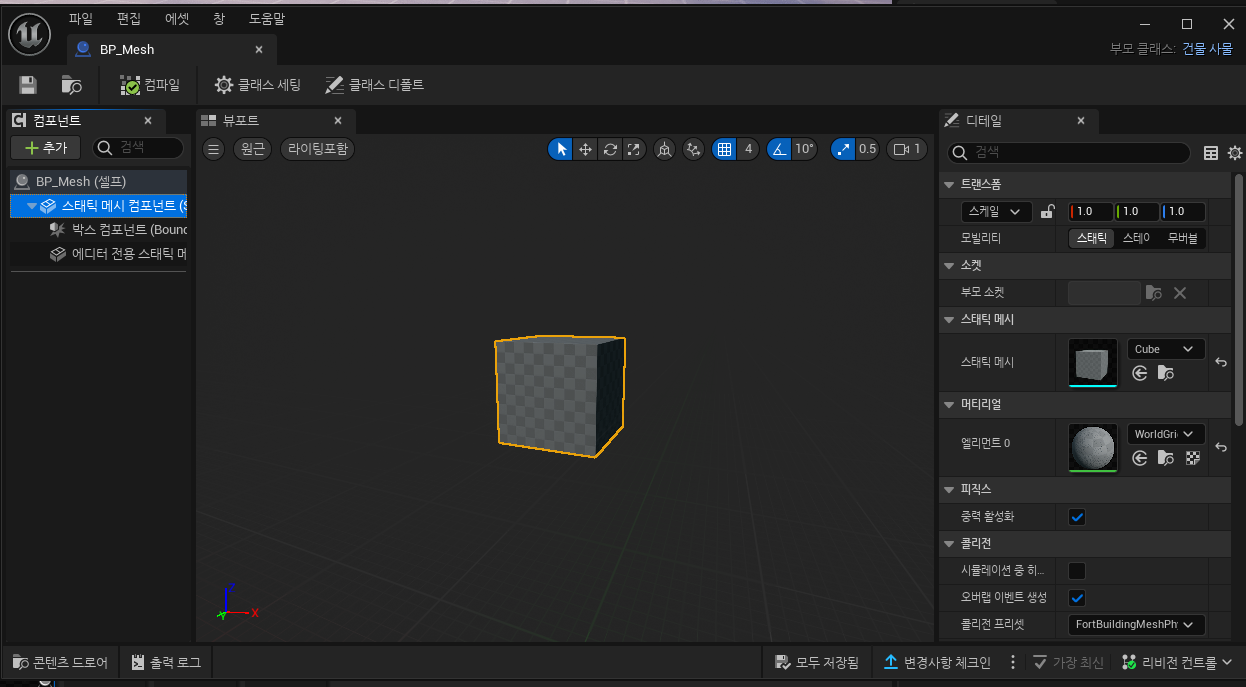
    아무 메쉬나 스태틱 메시 컴포넌트에 등록한다. 


    전 글에서 Verse 스크립트 생성을 써서 스킵하겠다.

    Verse로 디바이스를 선택해 아래와 같이 작성한다. 

    using { /Fortnite.com/Devices }
    using { /Verse.org/Native }
    using { /Verse.org/Simulation }
    using { /UnrealEngine.com/Temporary/Diagnostics }
    
    log_platform_series := class(log_channel){}
    
    Test_Verse01 := class<concrete>(creative_device):
        Logger : log = log{Channel := log_platform_series}
    
        @editable
        HeadStart : float = 2.45
     
        @editable
        AppearDelay : float = 0.98
     
        @editable
        DisappearDelay : float = 1.11
     
        @editable
        Platforms : []creative_prop = array{}
    
        OnBegin<override>()<suspends> : void =
    
            loop:
                sync:
                    ShowAllPlatforms() # 이 동시 실행 루틴은 즉시 시작되며 block 표현식과 동시에 실행됩니다.
                    block: # block 표현식은 ShowAllPlatforms()와 동시에 바로 시작됩니다. 이 코드 블록 내의 모든 표현식은 순차적으로 실행됩니다.
                        Sleep(HeadStart) # HeadStart초 동안 기다린 후에 HideAllPlatforms()이 실행됩니다.
                        HideAllPlatforms() # HeadStart초 후에 이 동시 실행 루틴이 실행됩니다.
    
        ShowAllPlatforms()<suspends> : void =
            for (PlatformNumber -> Platform : Platforms):
                Logger.Print("Platform{PlatformNumber} is now shown.") 
                Platform.Show()
                Sleep(AppearDelay)
    
        HideAllPlatforms()<suspends> : void =
            for (PlatformNumber -> Platform : Platforms):
                Logger.Print("Platform{PlatformNumber} is now hidden.") 
                Platform.Hide()
                Sleep(DisappearDelay)


    Sync는  Verse 언어에서 사용되는 키워드 중 하나로, 동시 실행 루틴을 시작하는 데 사용된다.

    유니티 코루틴 생각하면 될 듯. 

    Block 키워드는 아래로 무조건 순차적으로 진행되는 코드를 그룹화하여, 순서 보장을 한다.

    그래서, 모든 블랙폼을 보여주면서 동시에 숨김을 하는

    작업 사이에 Sleep을 주어 순차적으로 사라지는 바닥이 구현된다.


    위에서 만든 바닥들이 Creative_prob에 해당된다. @editable으로 디테일 창에 노출시켰으니, 등록해 주자

    + 여담이지만 UPROPERTY(EditAnywhere)와 같은 매크로와 블루프린트에 노드를 사용 못한다는 게 아쉽다.


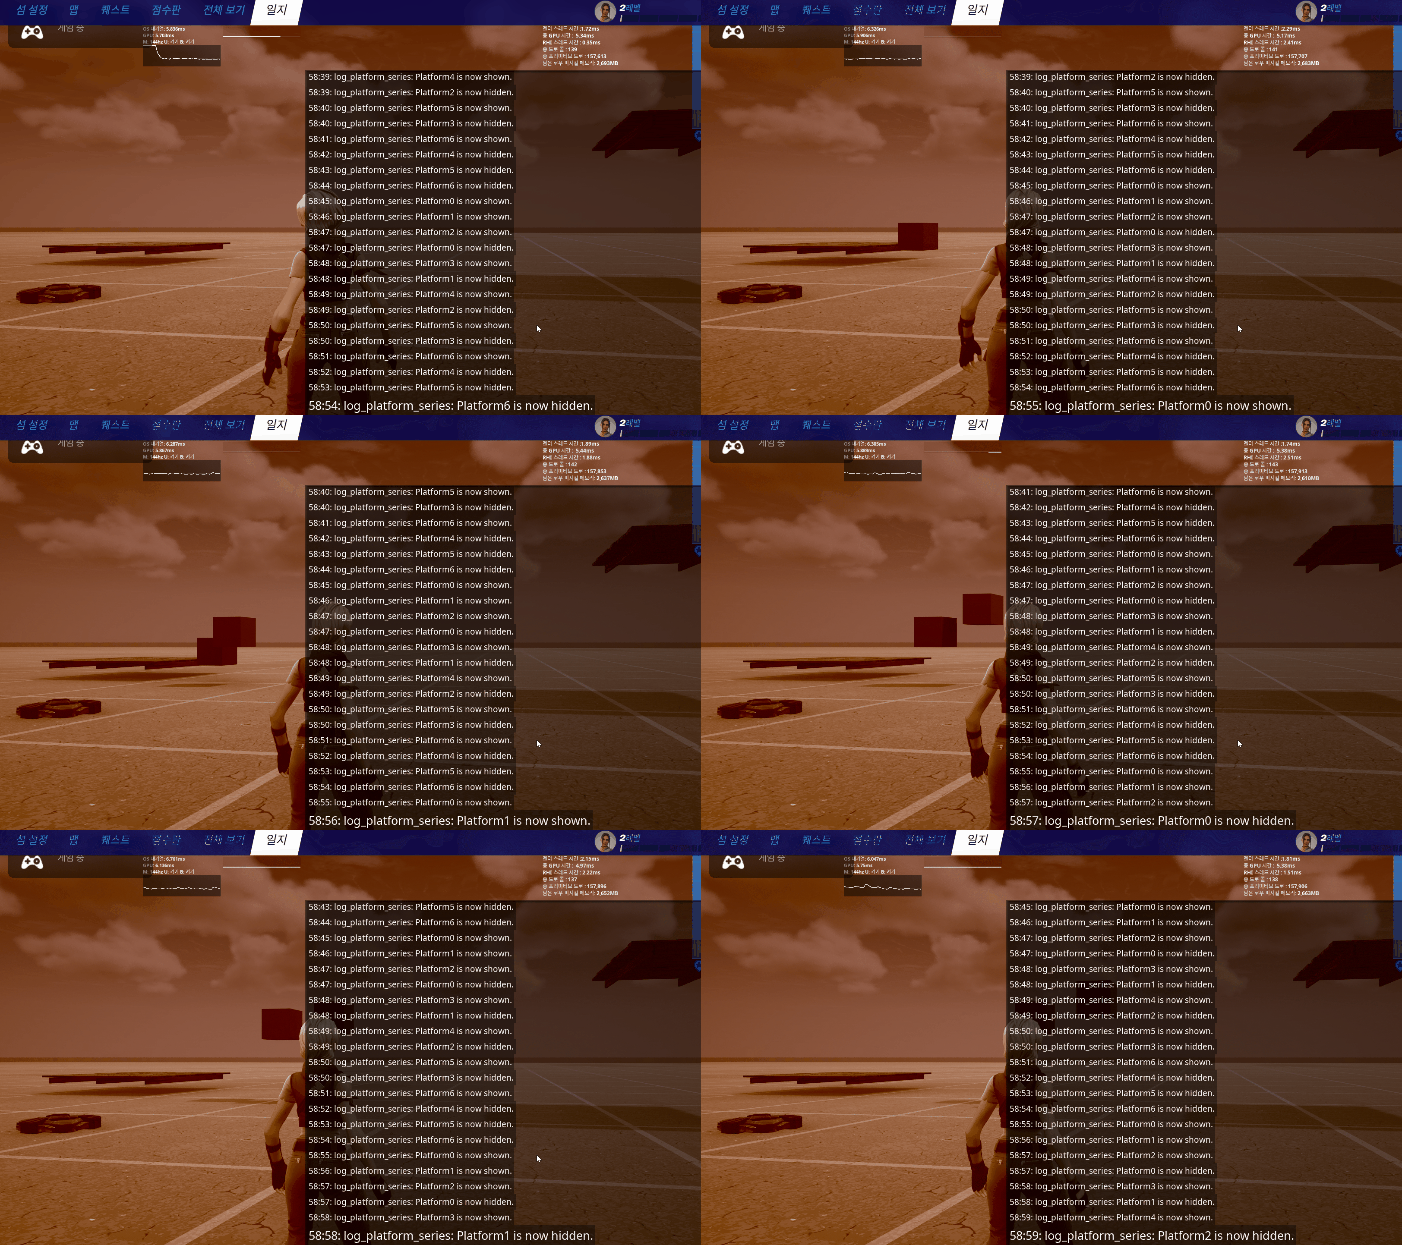
    순차적으로 사라졌다 생기는 플랫폼들을 확인할 수 있다.


    'STUDY > UEFN' 카테고리의 다른 글

    UEFN - 프로젝트 생성 및 로그 남기기  (0) 2024.03.04
    COMMENT
     
    03
    04

    https://dev.epicgames.com/community/fortnite/getting-started/uefn


    UEFN - Getting Started | Epic Developer Community

    The Epic Developer Community offers UEFN learning materials for new users getting started.

    dev.epicgames.com

    포트나이트에서 모드를 개발하기 위한 UFFN (Unreal Editor for Fortnite)와 포트나이트가 필요하다.


    언리얼 엔진을 해보신 분이라면 친숙할 것이다. 기본 맵을 선택 해서 켜준다. 


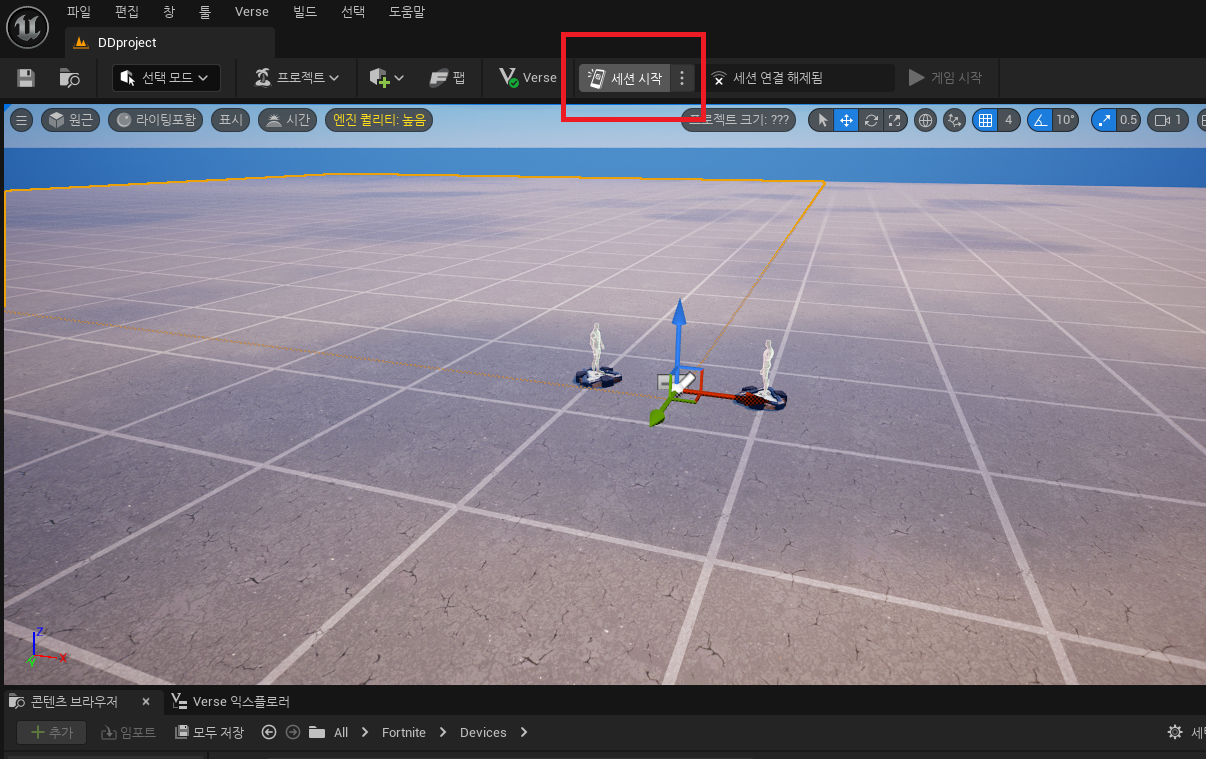
    Alt + P 혹은 세션 시작 버튼을 누르면 클라이언트 포트나이트가 켜지고, 에디터와 세션을 맺는다.

    한 2분~3분 정도 기다려 줘야 한다.


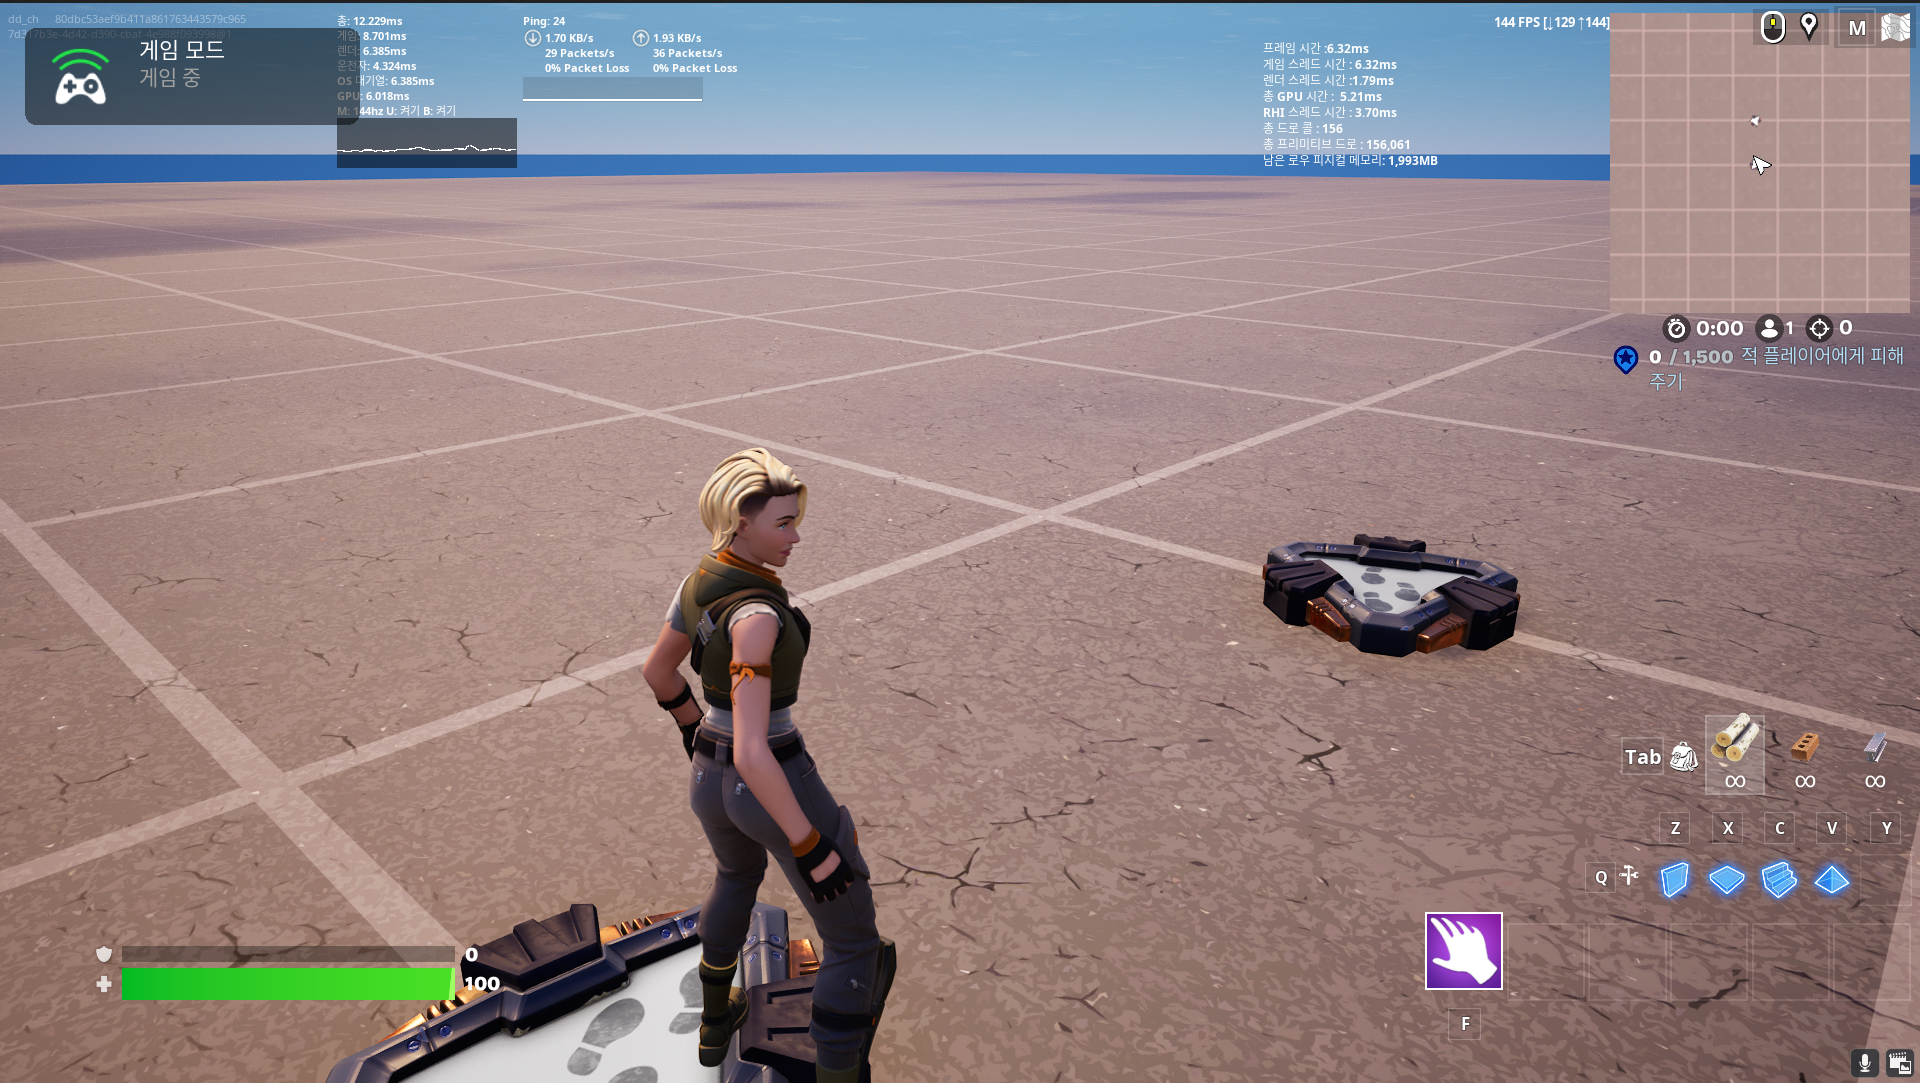
    에디터에서 봤던 맵이 포트나이트 게임에서 실행되는 것을 볼 수 있다.

    언리얼에서 포트나이트를 위해 이런걸 제공한다니 정말 놀랍다


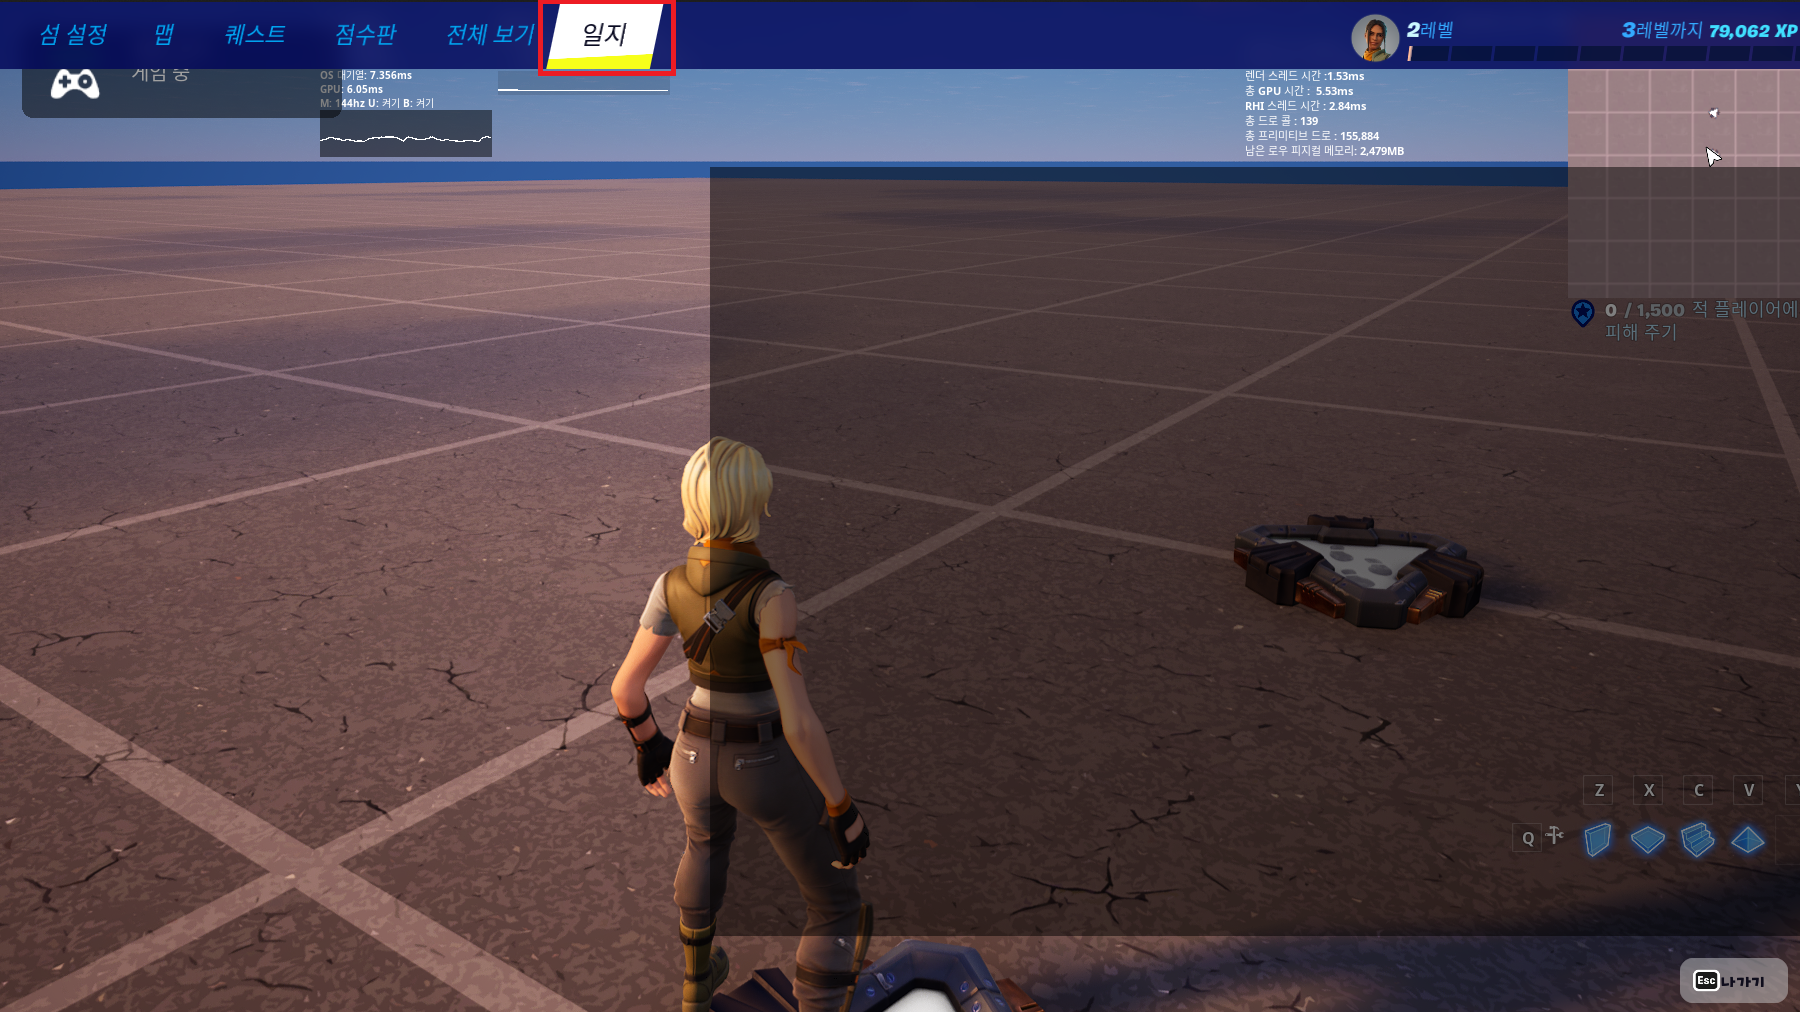
    로그를 확인하기 위해서는 섬 설정 -> 일지에서 확인해 볼 수 있다.

    영문으로는 로그인데, 일지는 좀..

    해외 유튜버들은 TAB으로 간단히 눌러서 로그 보던데.. 그 방법은 나중에 찾아봐야겠다.


    Verse는 언리얼에서 개발한 새로운 언어이다. 사실 내가 이걸 해보는 이유도

    포트나이트라는 게임을 하나의 새로운 플랫폼으로 만들게 된 것도 있고

    Verse가 얼마나 C++을 대체 가능할 만큼?

    또 입문자들이 쉽게 구현할 수 있게 잘 되어 있을까라는 의구심으로 진행 중이다.   


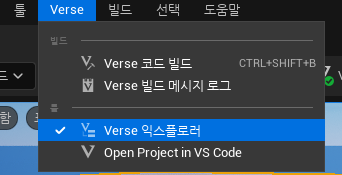
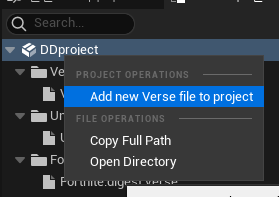
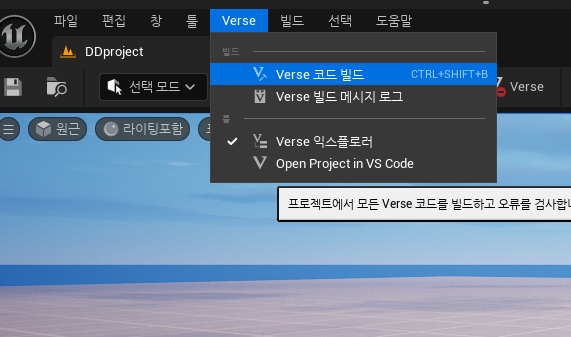
    상단 Verse 탭에서 Verse 익스플로러를 선택해 주고 프로젝트에서 새 Verse 파일을 추가한다.

    그러면 VS Code가 설치가 되거나 켜지게 될 것이다. 아마 익스텐션도 자동으로 설치가 되는 듯


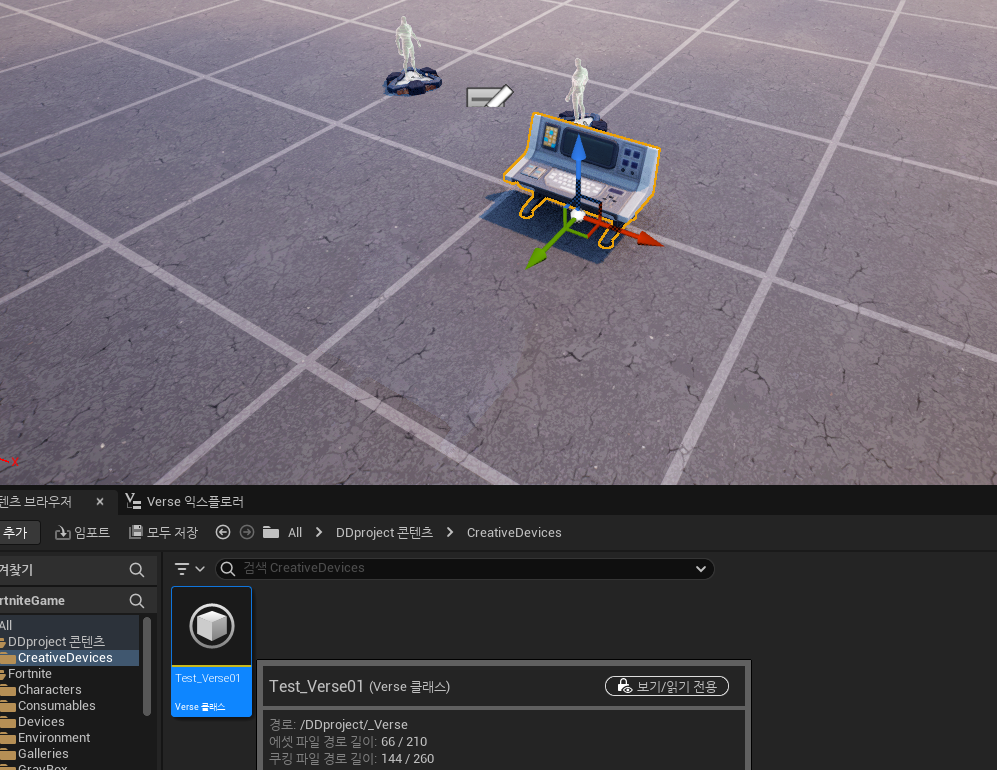
    파일이 추가되면 콘텐츠 브라우저에도 추가되어서 해당 에셋을 레벨에 드래그해서 배치한다.


    using { /Fortnite.com/Devices }
    using { /Verse.org/Simulation }
    using { /UnrealEngine.com/Temporary/Diagnostics }
    
    
    Test_Verse01 := class(creative_device):
    
        OnBegin<override>()<suspends>:void=
            var StringType : string = "dd"
            var intType : int = 1
            var floatType : float = 1.0
            var boolType : logic = true
            
            if(boolType?):
                Print("str {StringType}, int {intType}, float {floatType}")
            else:
                Print("boolType Wrong")
    
            set boolType = false;
            Print("Make bool Type false\n\n")
    
            if(boolType?):
                Print("str {StringType}, int {intType}, float {floatType}")
            else:
                Print("boolType Wrong")

    디버깅 테스트를 위해 위처럼 대충 출력하는 코드를 입력해 주자.

    여기서 코드를 수정하거나 추가했을 때, 바로 변경사항 푸시를 하지 말고 빌드를 하자.


    변경 사항 푸시가 있고, Verse 변경 사항 푸시가 있는데, 변경사항 푸시는 한참 걸리니

    코드만 수정되었을 때는 코드만 푸시하는 걸 권장한다.


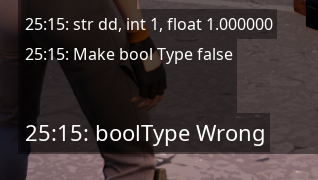
    아까 로그창에 정상적으로 출력되는 걸 확인할 수 있다.

    'STUDY > UEFN' 카테고리의 다른 글

    UEFN - 사라지는 바닥  (0) 2024.03.04
    COMMENT
     
    10
    18

    Chunk

    Chunk는 독립적으로 배포가 가능하고 다운로드를 가능하게 하는 에셋 묶음이다. 


    Chunk0은 기본 프로젝트 콘텐츠, 무조건적으로 프로젝트당 하나 있게 되고    

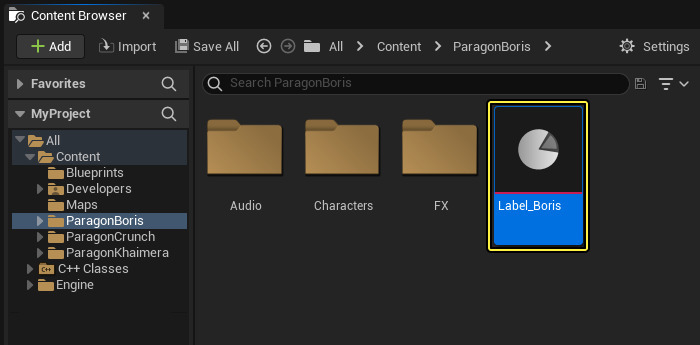
    언리얼 에디터에서 DataAsset 타입으로 PrimaryAssetLabel 파일을 추가해서

    Chunk1..2..3..?? 해당 디렉터리에 있는 파일을 다운로드 가능하게 묶는 것이 청크 세팅이다. 


    PakFile

    Unreal Automation Tool로 패키징 시 청크가 세팅된 대로 CDN을 위한 Pak 파일을 생성하는 과정이 이뤄진다.

    .Zip 파일 압축파일처럼 여러 개의 리소스를 압축해 놓은 것이다. 내부 구조는 아래 링크에서 굉장히 잘 설명해 준다.

    https://zhuanlan.zhihu.com/p/54531649


    UE4 Pak 文件格式

    UE4 打包过程中,会调用 UnrealPak 将 Cook 后的文件资源打包成一整个 Pak 文件,这个 Pak 中的内容可以分为三大块,按写入顺序分别为: 文件内容区 + 文件索引信息区 + Pak文件信息区文件内容区: 依

    zhuanlan.zhihu.com


    Pak 내부에는 리소스 내용 구간, 파일 인덱스 내용 구간, pak 파일 정보 내용 구간 3가지 구간으로 나뉜다.

    (구간이라고 말하는 것은 순차적으로 직렬 저장되기 때문)


    리소스 내용 구간

    Pak 파일의 시작 부분에 위치하고 각 파일의 FPakEntry와 실제 파일 내용을 차례로 저장한다.

    FPakEntry는 한 pak안에 수많은 리소스 중 한 개의 리소스이다. 리소스 크기와 pak 파일 안에 어디 있는지 알기 위한 offset이 있다


    파일 인덱스 내용 구간

    CDN을 받을 때 올바른 경로에 넣어주는 것 (마운트)을 하려면, Pak 파일 안에 수많은 리소스에 대한 경로..?

    모든 리소스 파일들은 Files에 저장되는데 각자마다 인덱스가 있다. 인덱스는 FPakDirectory 경로와 매핑돼있다. 또

    각 리소스 파일 이름과 인덱스 번호도 매핑된다. 

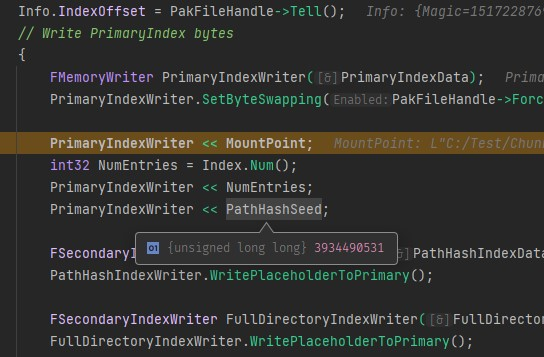
    엔진소스에서 UnrealPak.exe의 작동 방식을 확인 가능하다. 다 직렬화해서 저장하는 모습..


    pak 파일 정보 내용

    파일 마지막에 해당 내용이 있다. pak 파일의 마지막 위치( 45 바이트 로 고정)에 기록된다고 한다.

    IndexOffset ( Pak 파일 인덱스 정보 영역의 시작 위치 ),

    IndexSize ( 8바이트, Pak 파일 인덱스 정보 영역의 크기 ) ,

    IndexHash ( 20바이트, 파일 인덱스 정보의 SHA1 값 )


    UnrealPak.exe

    엔진경로\Engine\Binaries\Win64\UnrealPak.exe


    해당 경로에서 Pak파일을 생성하고 조회하고 압축해제 해주는 실행파일을 찾을 수 있다.

    명령어는 아래와 같이 확인해 볼 수 있다.


    UnrealPak <PakFilename> -Test
    UnrealPak <PakFilename> -List [-ExcludeDeleted]
    UnrealPak <PakFilename> <GameUProjectName> <GameFolderName> -ExportDependencies=<OutputFileBase> -NoAssetRegistryCache -ForceDependsGathering
    UnrealPak <PakFilename> -Extract <ExtractDir> [-Filter=<filename>]
    UnrealPak <PakFilename> -Create=<ResponseFile> [Options]


    일반적으로 위 명령어 대로 하면 되지만 Pak에 암호화가 걸려있을 때는 -CryptoKeys 명령어를 붙여줘야 한다. 그리고

    프로젝트에서 암호화 설정 시 자동으로 생성된 Crypto.Json의 파일 경로를 입력해줘야 한다. 


    배치 파일 조회 예시

    ::::::::::::::::::::::::::::::::::::::::::::::::::::::::::::::::::::::::
    :: Choi Jiwon 
    :: Pak 파일 정보 조회
    ::::::::::::::::::::::::::::::::::::::::::::::::::::::::::::::::::::::::
    
    @echo off
    
    SET EnginePath="{엔진경로}"
    SET PakPath="%~dp0{Pak 파일 경로}"
    SET CryptoFilePath="%~dp0Crypto.json"
    
    %EnginePath%\Engine\Binaries\Win64\UnrealPak.exe %PakPath% -Info -CryptoKeys=%CryptoFilePath%


    배치 파일 압축해제 예시

    ::::::::::::::::::::::::::::::::::::::::::::::::::::::::::::::::::::::::
    :: Choi Jiwon 
    :: Pak 파일 압축 해제
    ::::::::::::::::::::::::::::::::::::::::::::::::::::::::::::::::::::::::
    
    @echo off
    
    SET EnginePath="{엔진경로}"
    SET PakPath="%~dp0{팩 파일 경로}"
    SET CryptoFilePath="%~dp0Crypto.json"
    
    @echo "Extract Folder Created"
    
    if exist %PakPath%_extracted (
        rmdir /s /q %PakPath%_extract
    )
    
    %EnginePath%\Engine\Binaries\Win64\UnrealPak.exe %PakPath% -Extract %PakPath%_extracted -CryptoKeys=%CryptoFilePath%
    COMMENT
     
    10
    17

    언리얼 에디터에서 패키징하면 로그에서 실행되는 것을 볼 수 있듯

    UAT는 Unreal Automation Tool으로 빌드/패키징을 실행하는 배치파일이다.


    BuildCookRun 명령어로 에디터를 켜지 않고도 패키징 과정을 할 수 있는데,

    젠킨스, 자동화 툴을 통해 패키징을 할 수 있는 것이다. 


    엔진경로\Engine\Build\BatchFiles 경로에서 RunUAT 파일을 찾을 수 있다.

    Mac/Linux는. sh, Window는. bat 파일을 제공한다.


    RunUAT.bat -list


    명령어 리스트를 확인해보자

    자동화 패키징 시 필요한 것은 BuildCookRun 명령어이다.


    // Window(64비트) 프로젝트 빌드 예시 (DebugGame)
    
    RunUAT.bat BuildCookRun -project="<ProjectPath>.uproject" -platform=Win64
    -clientconfig=DebugGame -build -cook -stage -archive -archivedirectory="C:\Output" 
    
    // RAM Window(64비트) 프로젝트 빌드 예시 (Shipping)
    RunUAT.bat BuildCookRun -project="<ProjectPath>.uproject" -platform=Win64 -clientconfig=Shipping 
    -build -cook -stage -archive -archivedirectory="D:\Output" -nodebuginfo


    위 Shipping 예시에서 -nodebuginfo를 명령어 줄에 추가하는 이유는

    .pdb 디버그 파일을 포함하지 않기 위함이다. 

    필요한 명령이 필요하면 더 추가하면 된다. RunUAT.bat BuildCookRun -help로 더 자세히 볼 수 있음

    더보기

    Parameters:
        -project=Path                           Project path (required), i.e: -project=QAGame,
                                                -project=Samples\BlackJack\BlackJack.uproject,
                                                -project=D:\Projects\MyProject.uproject
        -destsample                             Destination Sample name
        -foreigndest                            Foreign Destination
        -targetplatform=PlatformName            target platform for building, cooking and deployment (also -Platform)
        -servertargetplatform=PlatformName      target platform for building, cooking and deployment of the dedicated
                                                server (also -ServerPlatform)
        -foreign                                Generate a foreign uproject from blankproject and use that
        -foreigncode                            Generate a foreign code uproject from platformergame and use that
        -CrashReporter                          true if we should build crash reporter
        -cook,                                  -cookonthefly Determines if the build is going to use cooked data
        -skipcook                               use a cooked build, but we assume the cooked data is up to date and where
                                                it belongs, implies -cook
        -skipcookonthefly                       in a cookonthefly build, used solely to pass information to the package
                                                step
        -clean                                  wipe intermediate folders before building
        -unattended                             assumes no operator is present, always terminates without waiting for
                                                something.
        -pak                                    generate a pak file
        -iostore                                generate I/O store container file(s)
        -cook4iostore                           generate I/O store container file(s)
        -zenstore                               save cooked output data to the Zen storage server
        -nozenautolaunch                        URL to a running Zen server
        -makebinaryconfig                       generate optimized config data during staging to improve loadtimes
        -signpak=keys                           sign the generated pak file with the specified key, i.e.
                                                -signpak=C:\Encryption.keys. Also implies -signedpak.
        -prepak                                 attempt to avoid cooking and instead pull pak files from the network,
                                                implies pak and skipcook
        -signed                                 the game should expect to use a signed pak file.
        -PakAlignForMemoryMapping               The game will be set up for memory mapping bulk data.
        -rehydrateassets                        Should virtualized assets be rehydrated?
        -skippak                                use a pak file, but assume it is already built, implies pak
        -skipiostore                            override the -iostore commandline option to not run it
        -stage                                  put this build in a stage directory
        -skipstage                              uses a stage directory, but assumes everything is already there, implies
                                                -stage
        -manifests                              generate streaming install manifests when cooking data
        -createchunkinstall                     generate streaming install data from manifest when cooking data, requires
                                                -stage & -manifests
        -skipencryption                         skips encrypting pak files even if crypto keys are provided
        -archive                                put this build in an archive directory
        -build                                  True if build step should be executed
        -noxge                                  True if XGE should NOT be used for building
        -CookPartialgc                          while cooking clean up packages as we are done with them rather then
                                                cleaning everything up when we run out of space
        -CookInEditor                           Did we cook in the editor instead of in UAT
        -IgnoreCookErrors                       Ignores cook errors and continues with packaging etc
        -nodebuginfo                            do not copy debug files to the stage
        -separatedebuginfo                      output debug info to a separate directory
        -MapFile                                generates a *.map file
        -nocleanstage                           skip cleaning the stage directory
        -run                                    run the game after it is built (including server, if -server)
        -cookonthefly                           run the client with cooked data provided by cook on the fly server
        -Cookontheflystreaming                  run the client in streaming cook on the fly mode (don't cache files locally
                                                instead force reget from server each file load)
        -fileserver                             run the client with cooked data provided by UnrealFileServer
        -dedicatedserver                        build, cook and run both a client and a server (also -server)
        -client                                 build, cook and run a client and a server, uses client target configuration
        -noclient                               do not run the client, just run the server
        -logwindow                              create a log window for the client
        -package                                package the project for the target platform
        -skippackage                            Skips packaging the project for the target platform
        -neverpackage                           Skips preparing data that would be used during packaging, in earlier
                                                stages. Different from skippackage which is used to optimize later stages
                                                like archive, which still was packaged at some point
        -distribution                           package for distribution the project
        -PackageEncryptionKeyFile               Path to file containing encryption key to use in packaging
        -prereqs                                stage prerequisites along with the project
        -applocaldir                            location of prerequisites for applocal deployment
        -Prebuilt                               this is a prebuilt cooked and packaged build
        -AdditionalPackageOptions               extra options to pass to the platform's packager
        -deploy                                 deploy the project for the target platform
        -getfile                                download file from target after successful run
        -IgnoreLightMapErrors                   Whether Light Map errors should be treated as critical
        -trace                                  The list of trace channels to enable
        -tracehost                              The host address of the trace recorder
        -tracefile                              The file where the trace will be recorded
        -sessionlabel                           A label to pass to analytics
        -stagingdirectory=Path                  Directory to copy the builds to, i.e. -stagingdirectory=C:\Stage
        -optionalfilestagingdirectory=Path      Directory to copy the optional files to, i.e.
                                                -optionalfilestagingdirectory=C:\StageOptional
        -optionalfileinputdirectory=Path        Directory to read the optional files from, i.e.
                                                -optionalfileinputdirectory=C:\StageOptional
        -CookerSupportFilesSubdirectory=subdir  Subdirectory under staging to copy CookerSupportFiles (as set in Build.cs
                                                files). -CookerSupportFilesSubdirectory=SDK
        -unrealexe=ExecutableName               Name of the Unreal Editor executable, i.e. -unrealexe=UnrealEditor.exe
        -archivedirectory=Path                  Directory to archive the builds to, i.e. -archivedirectory=C:\Archive
        -archivemetadata                        Archive extra metadata files in addition to the build (e.g.
                                                build.properties)
        -createappbundle                        When archiving for Mac, set this to true to package it in a .app bundle
                                                instead of normal loose files
        -iterativecooking                       Uses the iterative cooking, command line: -iterativecooking or -iterate
        -CookMapsOnly                           Cook only maps this only affects usage of -cookall the flag
        -CookAll                                Cook all the things in the content directory for this project
        -SkipCookingEditorContent               Skips content under /Engine/Editor when cooking
        -FastCook                               Uses fast cook path if supported by target
        -cmdline                                command line to put into the stage in UECommandLine.txt
        -bundlename                             string to use as the bundle name when deploying to mobile device
        -map                                    map to run the game with
        -AdditionalServerMapParams              Additional server map params, i.e ?param=value
        -device                                 Devices to run the game on
        -serverdevice                           Device to run the server on
        -skipserver                             Skip starting the server
        -numclients=n                           Start extra clients, n should be 2 or more
        -addcmdline                             Additional command line arguments for the program
        -servercmdline                          Additional command line arguments for the program
        -clientcmdline                          Override command line arguments to pass to the client
        -nullrhi                                add -nullrhi to the client commandlines
        -fakeclient                             adds ?fake to the server URL
        -editortest                             rather than running a client, run the editor instead
        -RunAutomationTests                     when running -editortest or a client, run all automation tests, not
                                                compatible with -server
        -Crash=index                            when running -editortest or a client, adds commands like debug crash, debug
                                                rendercrash, etc based on index
        -deviceuser                             Linux username for unattended key genereation
        -devicepass                             Linux password
        -RunTimeoutSeconds                      timeout to wait after we lunch the game
        -SpecifiedArchitecture                  Determine a specific Minimum OS
        -UbtArgs                                extra options to pass to ubt
        -MapsToRebuildLightMaps                 List of maps that need light maps rebuilding
        -MapsToRebuildHLODMaps                  List of maps that need HLOD rebuilding
        -ForceMonolithic                        Toggle to combined the result into one executable
        -ForceDebugInfo                         Forces debug info even in development builds
        -ForceNonUnity                          Toggle to disable the unity build system
        -ForceUnity                             Toggle to force enable the unity build system
        -Licensee                               If set, this build is being compiled by a licensee
        -NoSign                                 Skips signing of code/content files.

    예를 들어 패키징 시에 Pak 파일을 포함시키려면 

    RunUAT.bat BuildCookRun -project="<ProjectPath>.uproject" -platform=Win64 -clientconfig=Shipping 
    -build -cook -stage -pak -archive -archivedirectory="D:\Output" -nodebuginfo

    위처럼 명령어를 계속 추가하면 된다. 


    또한 아래처럼 배치파일로 원하는 패키징을 얻을 수 있다.

    @echo off
    
    REM The location of the UAT batch file.
    set UAT="<EngineDirectory>\Engine\Build\BatchFiles\RunUAT.bat"
    REM The location of your Unreal project.
    set PROJECT="<ProjectPath>.uproject"
    REM The location where the builds are going to be stored.
    set OUTPUT="D:\Output"
    
    REM Build both Shipping and DebugGame
    call %UAT% BuildCookRun -project=%PROJECT% -platform=Win64 -clientconfig=Shipping -build -cook -stage -archive -archivedirectory="%OUTPUT%\Shipping" -nodebuginfo
    call %UAT% BuildCookRun -project=%PROJECT% -platform=Win64 -clientconfig=DebugGame -build -cook -stage -archive -archivedirectory="%OUTPUT%\DebugGame"


    https://greenforestgames.eu/article/Building-Unreal-projects-with-UAT-1605886728

    COMMENT
     
    01
    02

    https://www.unrealengine.com/en-US/blog/download-our-new-blender-addons


    Download our new Blender addons

    We’ve released two new, free addons that greatly streamline the workflow between Blender and Unreal Engine. 

    www.unrealengine.com


    2020년 7월 30일 Blender Addon이 추가되었다.

    이를 이용하면 리깅과 익스포트가 용이해진다고 한다.

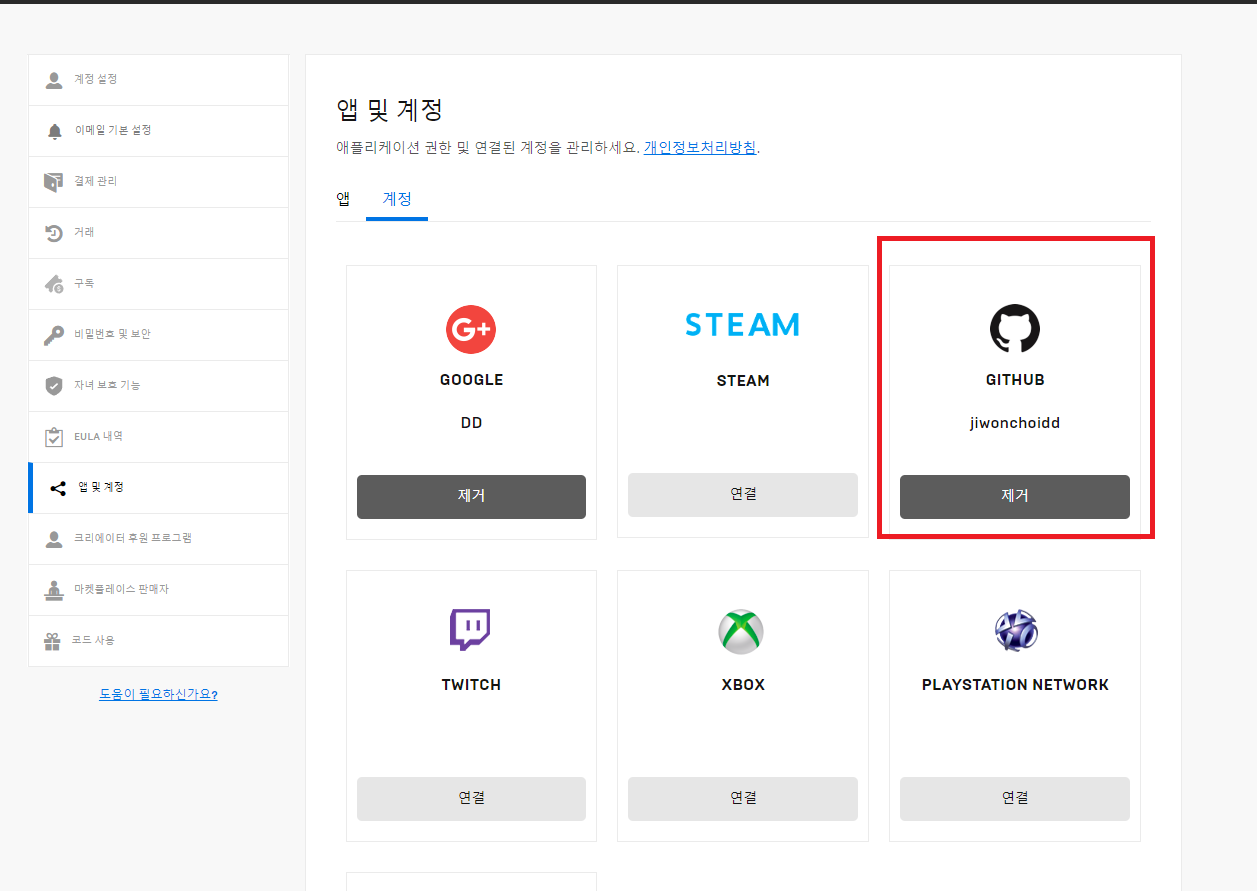
     다운로드하기 위해서는 언리얼 엔진 홈페이지에서 깃허브 계정을 연동해야 한다.

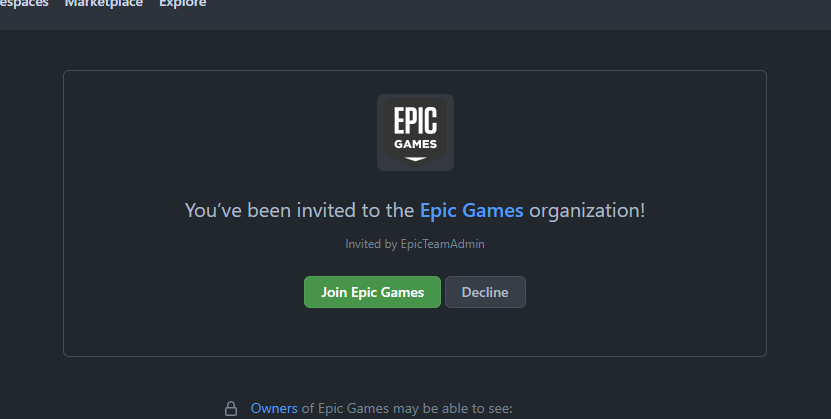
    이와 같은 화면이 뜨면 언리얼 레포지에 접근할 수 있게 된다. 

    아래 링크도 접속이 안된다면 위와 같은 절차를 밟아야 한다. 

    https://github.com/EpicGames/BlenderTools/releases?q=Send+to+Unreal&expanded=true

    위 링크가 Send2ue 블렌더 에드온이다. 


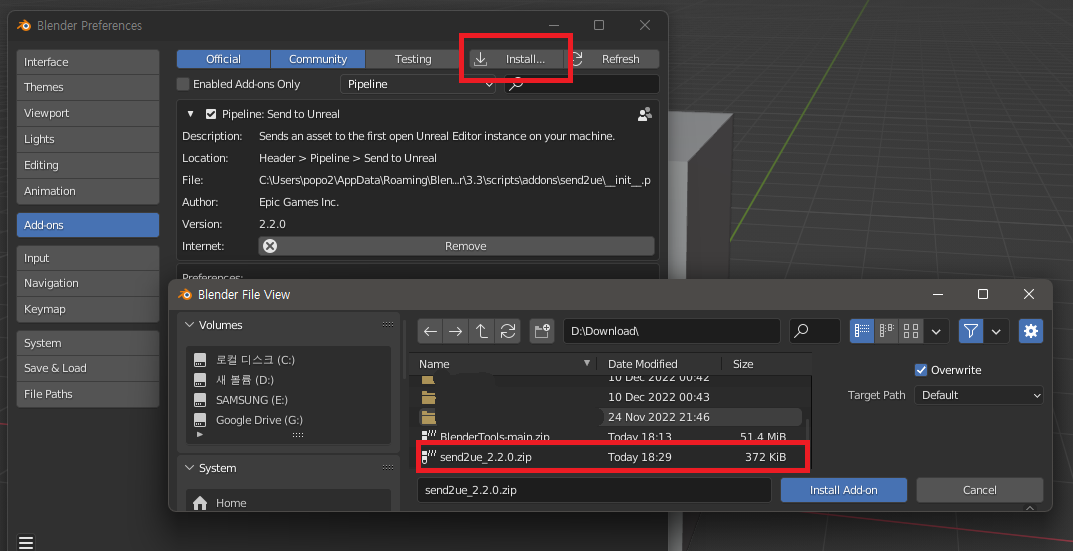
    다운로드하였다면 Blender Add-ons에서 해당 에드온을 추가한다.

    Blender 2.8부터 지원하는 것으로 알고 있다. 파이썬 지원하는 버전이면 가능하다


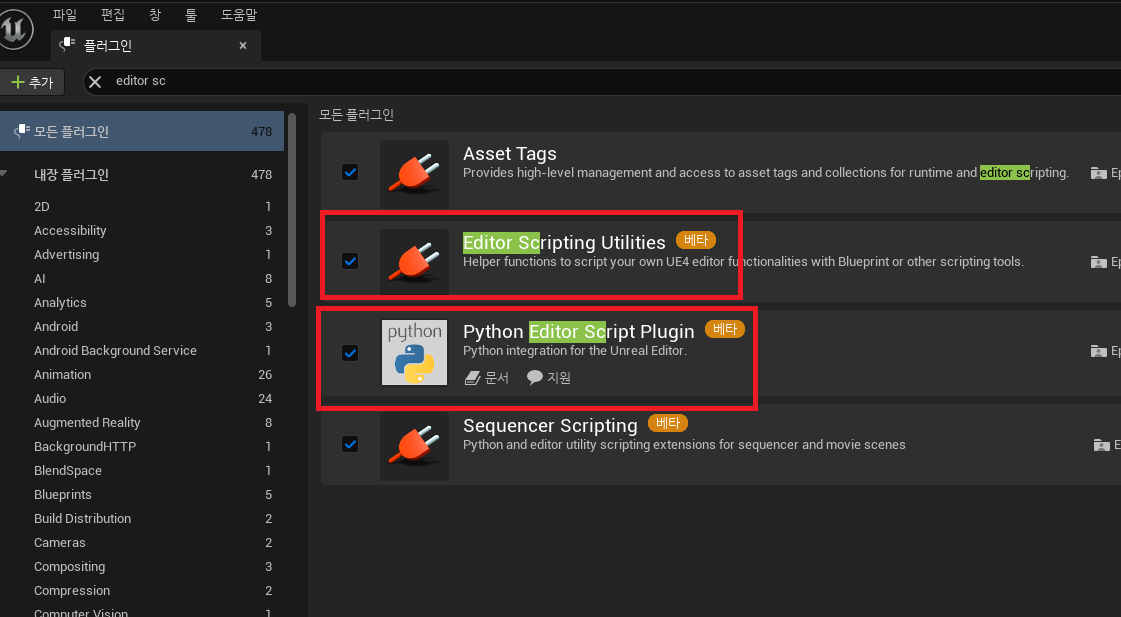
    언리얼에서는 플러그인 2개를 활성화해주어야 한다.


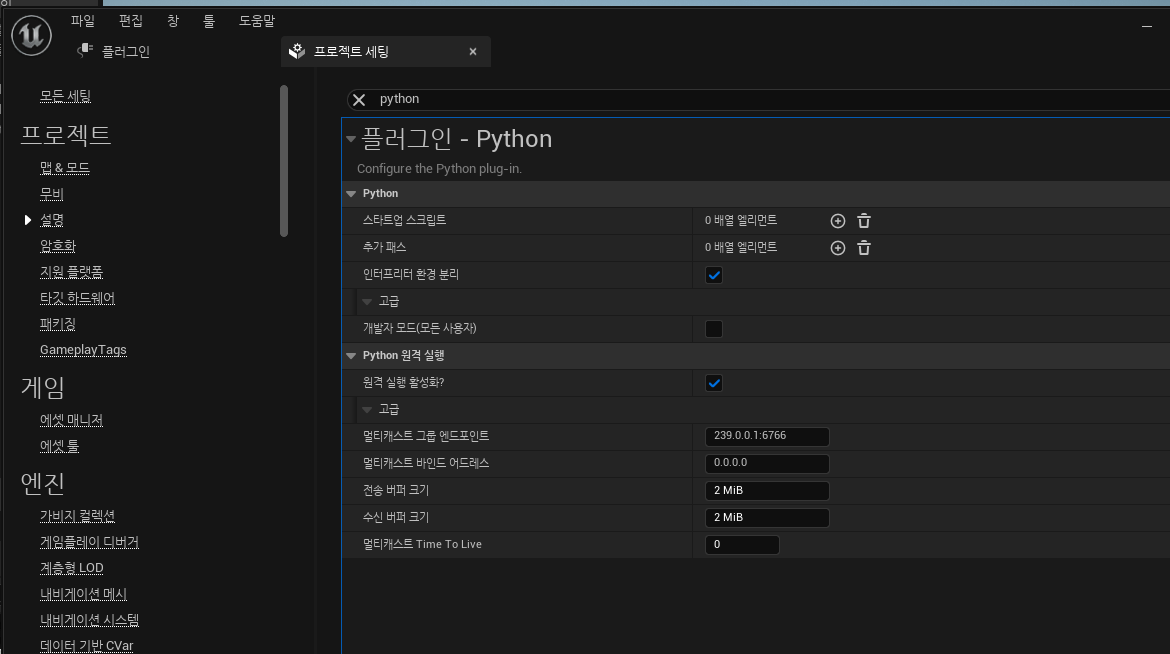
    그리고 프로젝트 세팅에서 파이썬 원격 실행 Enable Remote Excution를 켜준다.

    블렌더에서 수정해서 보내면 엔진으로 명령하도록 하게 한다. 


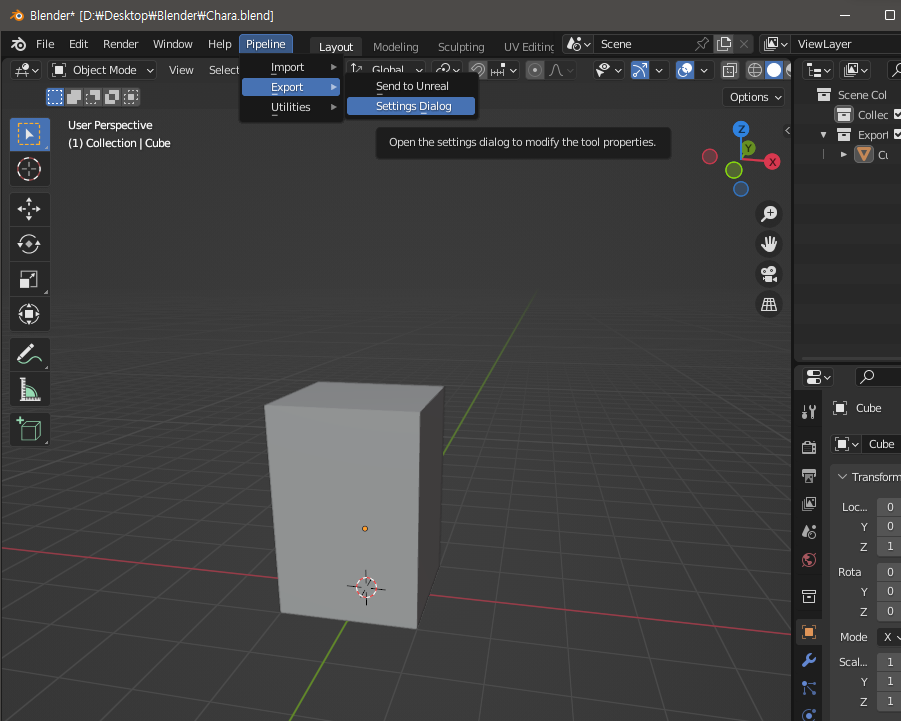
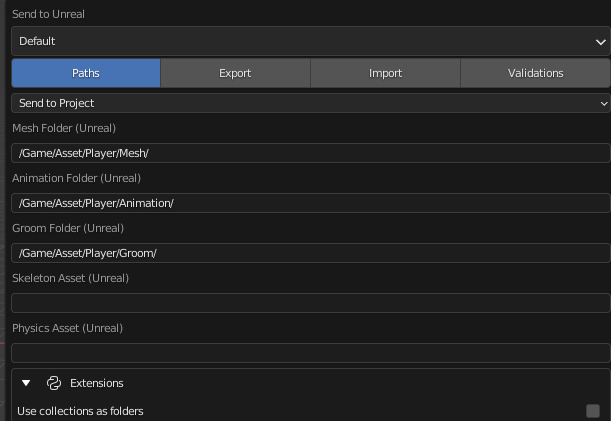
    새로 생긴 Pipeline 탭에서 세팅(Export > Setting Dialog) 적용할 프로젝트의 경로를 설정해 준다.


    블렌더 수정 후 Ctrl + U를 누르거나 Pipeline 탭에서 Export send to UE를 선택하면 

    수정된 블렌더가 즉각적으로 Uasset으로 변환되고 프로젝트에 적용이 된다. 


    예시 


    애니메이션도 포함된다고 하니 리깅 할 때도 유용한 워크플로우가 형성될 것 같다.

    결과 영상

    https://youtu.be/YBnwVDvqjNo


    COMMENT
     
    10
    21

    vs19로 언리얼 자동완성 기능을 위해서 Visual Assist X를 사용했었는데


    Visual Studio 2022가 64버젼으로 나오면서 

    Visual Assist X도 21년도에 새로 나왔다.


    요즘엔 Rider로 개발을 해서 Visual studio와 멀어졌지만,

    아직도 VS의 투박한 매력을 잊지 못하고 산다. 


    얼마나 빨라지고 편해졌을지 기대가 되면서

    설치를 해보겠다. (주말에)

    https://www.wholetomato.com/downloads


    'ETC' 카테고리의 다른 글

    개인정보처리방침  (0) 2021.05.12
    COMMENT